Introduction -
ClinicMaster - Healthcare and Medical Laravel CMS With Page Editor
ClinicMaster is a professionally designed Medical, Health Care Laravel CMS Based on W3cms, a content management system (CMS) that provides a user-friendly platform for managing websites and digital content. This cms themes are fully compatible with the latest versions of both W3cms (2.4v) and Laravel (12.x).
ClinicMaster a platform which can be extended in a manageable and structured way to develop large applications without reinventing extremely common functionality every time.
The integration of ClinicMaster with W3cms and Laravel 12.x means users can take full advantage of Laravel's powerful routing, middleware, authentication, and data management features, while enjoying the flexibility of a theme that is easy to install and configure.
- Installation Like Wordpress.
- Extremely fast control/admin panel.
- Extend control/admin panel with no major learning.
- Users, Roles & Permissions Management.
- Install prebuilt modules & themes
- Build purpose specific isolated code
- Themes Manager: Multiple frontend themes With Separate Elements and One Click Demo
This documentation is last updated on 04 October 2025.
Thank you for purchasing this CMS.
If you like this CMS, Please support us by rating this CMS with 5 stars
Installation -
Basic Instructions :-
Before you begin the install, there are a few things you need to have and do.
- 1. Laravel needs specific environment in order to run smoothly. Please see requirements section in Laravel documentation.
- 2. ClinicMaster utilizes Composer to manage its dependencies. So, before using ClinicMaster, make sure you have Composer installed on your machine.
- 3. unzip the ClinicMaster CMS package into your desire folder.
- 4. Create a database for ClinicMaster on your web server, as well as a MySQL user who has all privileges for accessing and modifying it.
- 5. Please watch the video below to see the installation process of ClinicMaster.
Installation Steps :-
Before you begin the install, there are a few things you need to have and do.
Note: Run the Clinicmaster installation by accessing the URL in a web browser and Follow these simple steps for intallation.
Open the root folder in cmd and run following commands before installation:-
-
composer install
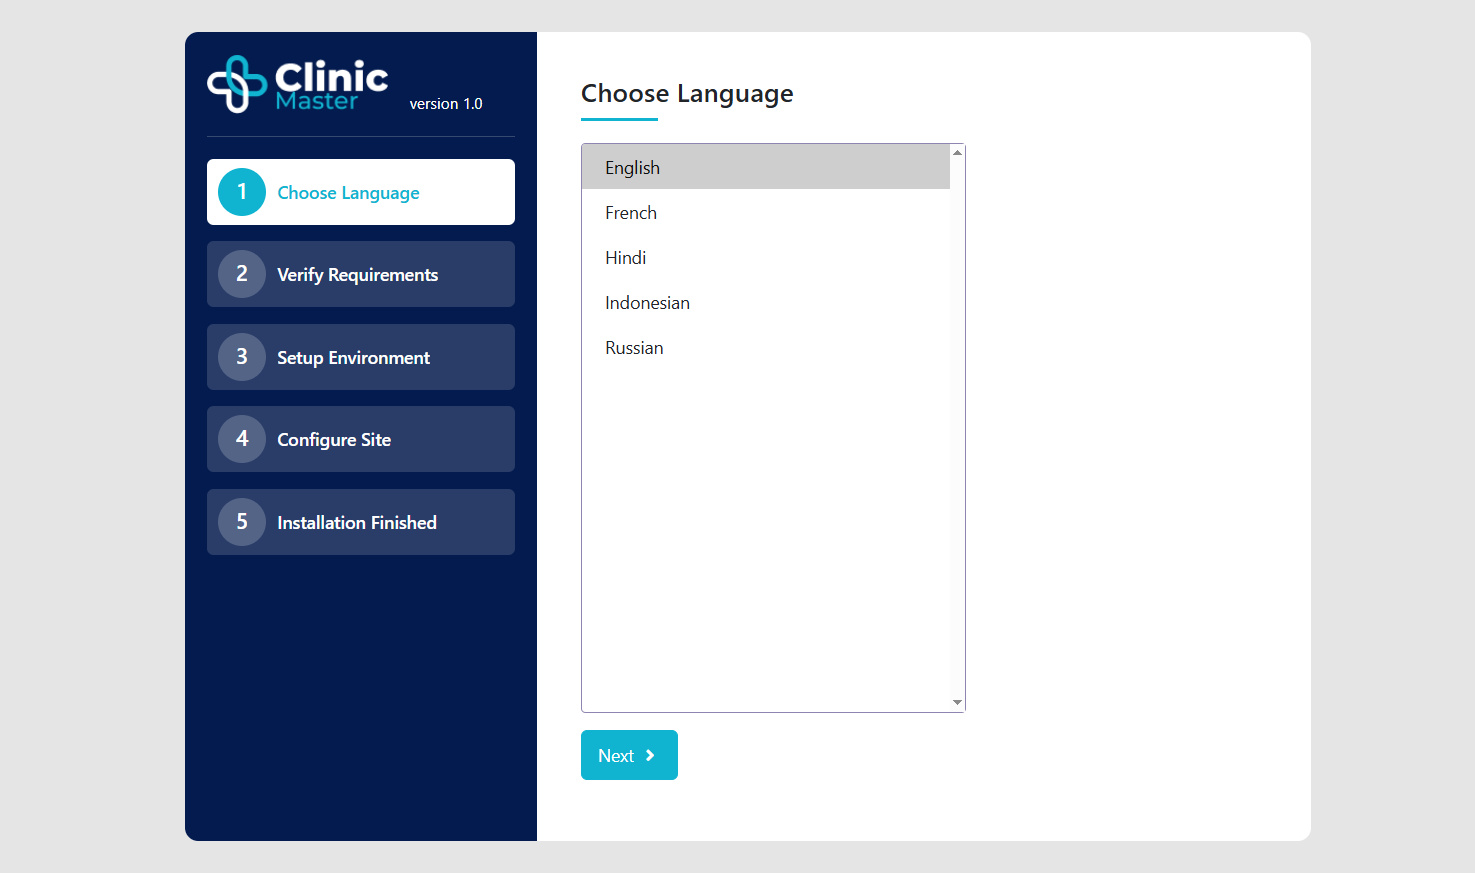
Step 1: Choose Language
let's choose language and continue the process to ClinicMaster installation.
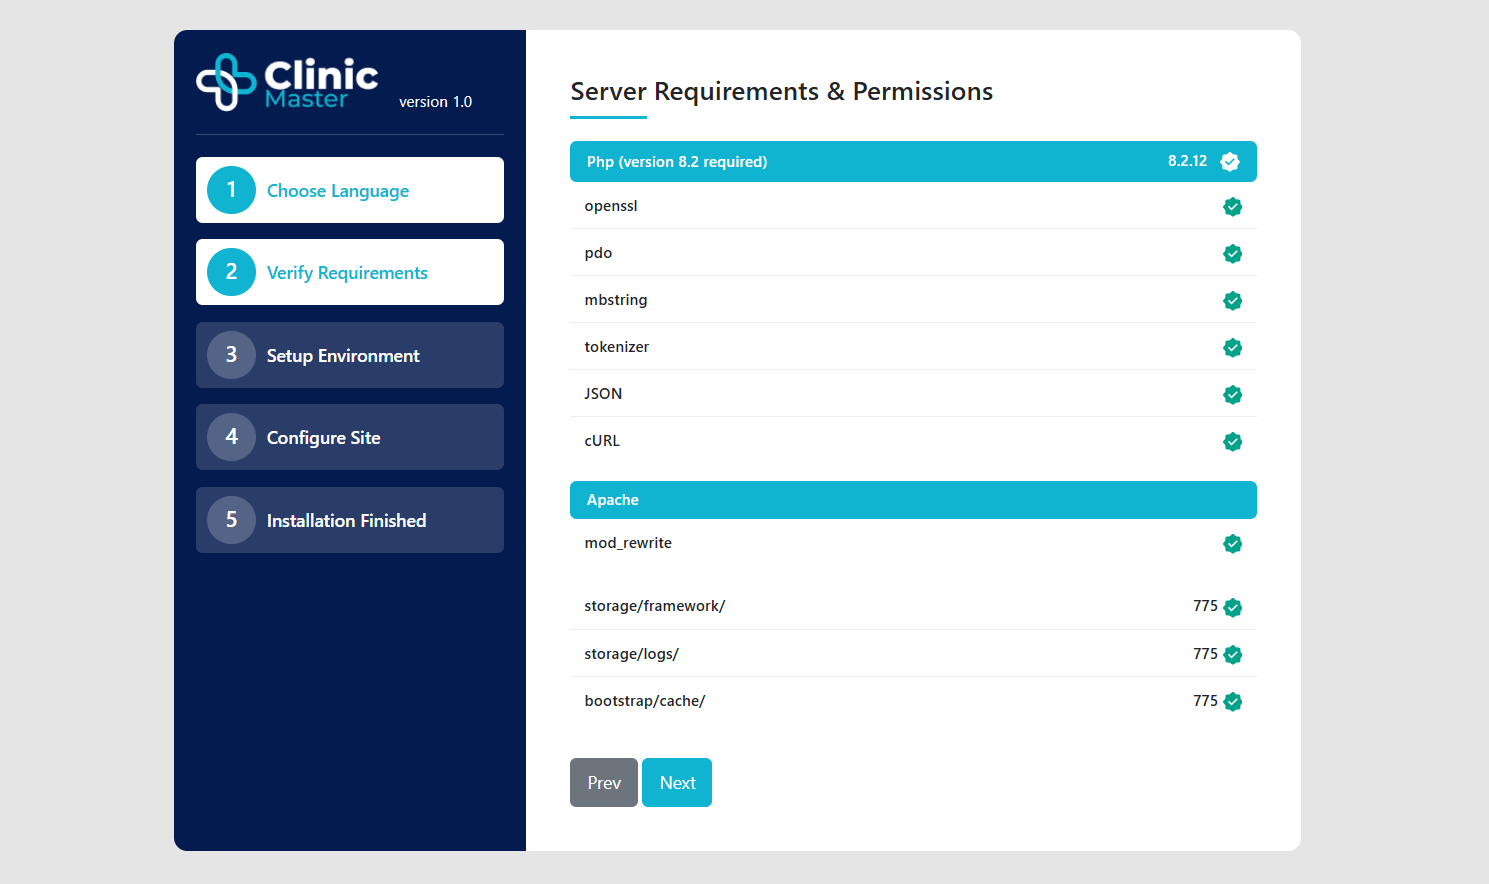
Step 2: Server Requirements
Please check the following requirements:
- PHP version 8.2 or higher
- Composer 2.6 or higher
- OpenSSL PHP Extension
- PDO PHP Extension
- Mbstring PHP Extension
- Tokenizer PHP Extension
- JSON PHP Extension
- cURL PHP Extension
- SQLite PHP Extension
- XML PHP Extension
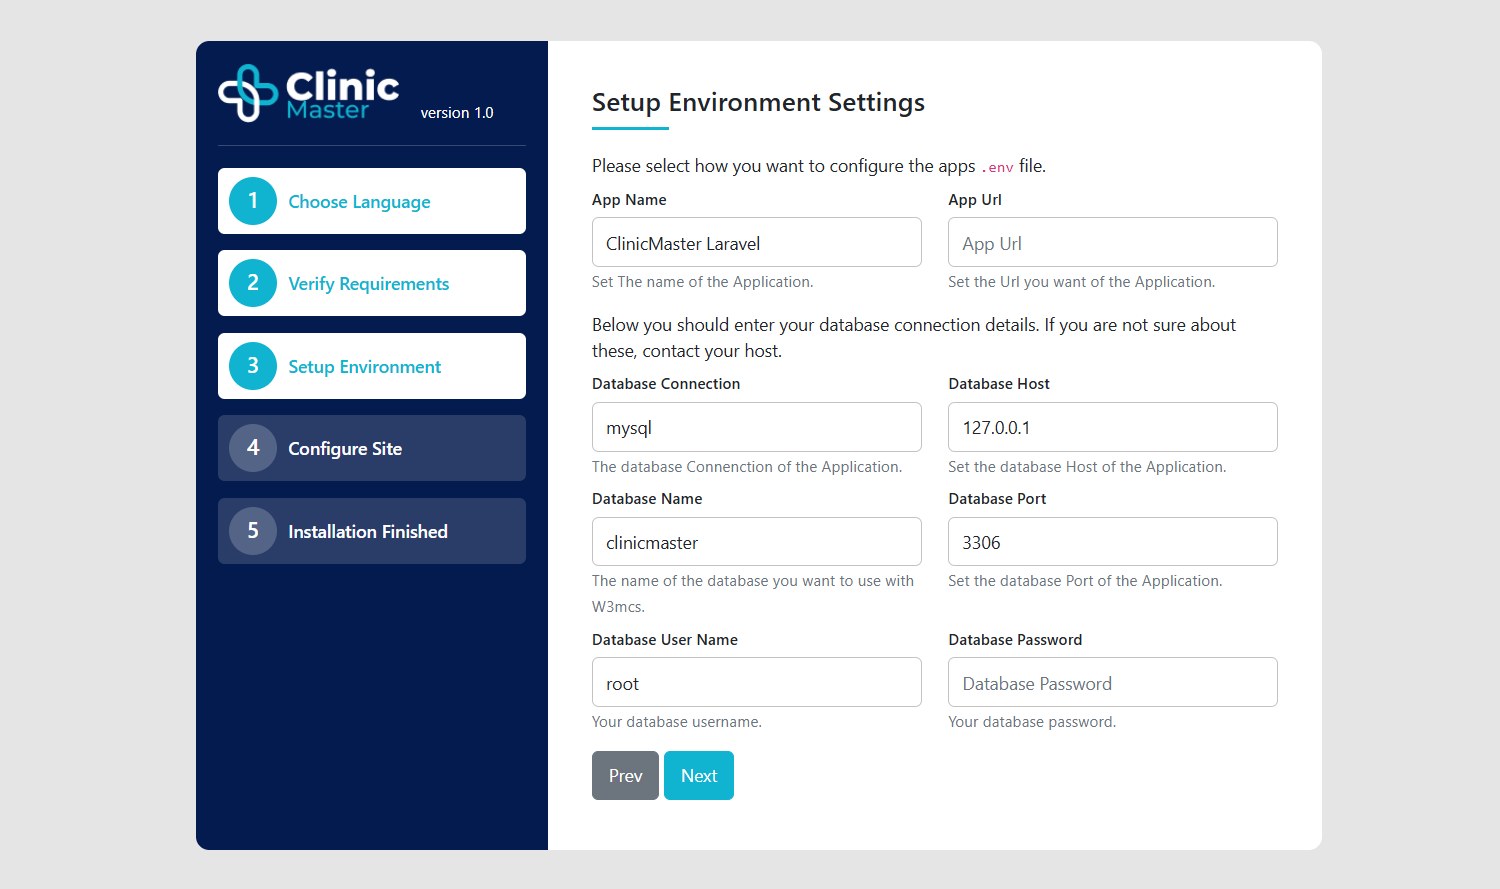
Step 3: Environment And Database Setup
Laravel environment settings has been saved in .env file, in this step we configure the Application settings.
- We need to fill some following details to set environment.
- (i). App Name.
- (ii). App URL: http://xyz.com/(root directory folder name)
- (iii). Database Connection.
- (iv). Database Host.
- (v). Database Port.
- (vi). Database Name
- (vii). Database User Name
- (xi). Database Password
Step 4: Admin Setup
- in this step We need to fill some following details to set Admin Settings:
- (i). Admin Name.
- (ii). Admin Email.
- (iii). Admin Email Password.
- (iv). Admin Email Confirm Password.

Step 5: Installation Finished
and finally we will see the installation finished screen, Just click on the "click here to login" button and login in W3cms Application. After you've logged in you'll be able to access the administration panel on the /admin URI.

Upload Local To Live Server -
How To Upload Package On Live Server:
- Remove all cache before upload package.
- Use
php artisan optimize:clearcommand to clear cache. - Delete the "themes" and "storage" folders from the public directory.
- Create a zip file of your package, then proceed to upload it to your server and extract.
- After extracting the package, please upload your database.
- Please update the app and base URL, as well as the database credentials in the
.envfile.
What's New -
Localization
- Translation editor in admin panel.
- Update language string directly using this feature.
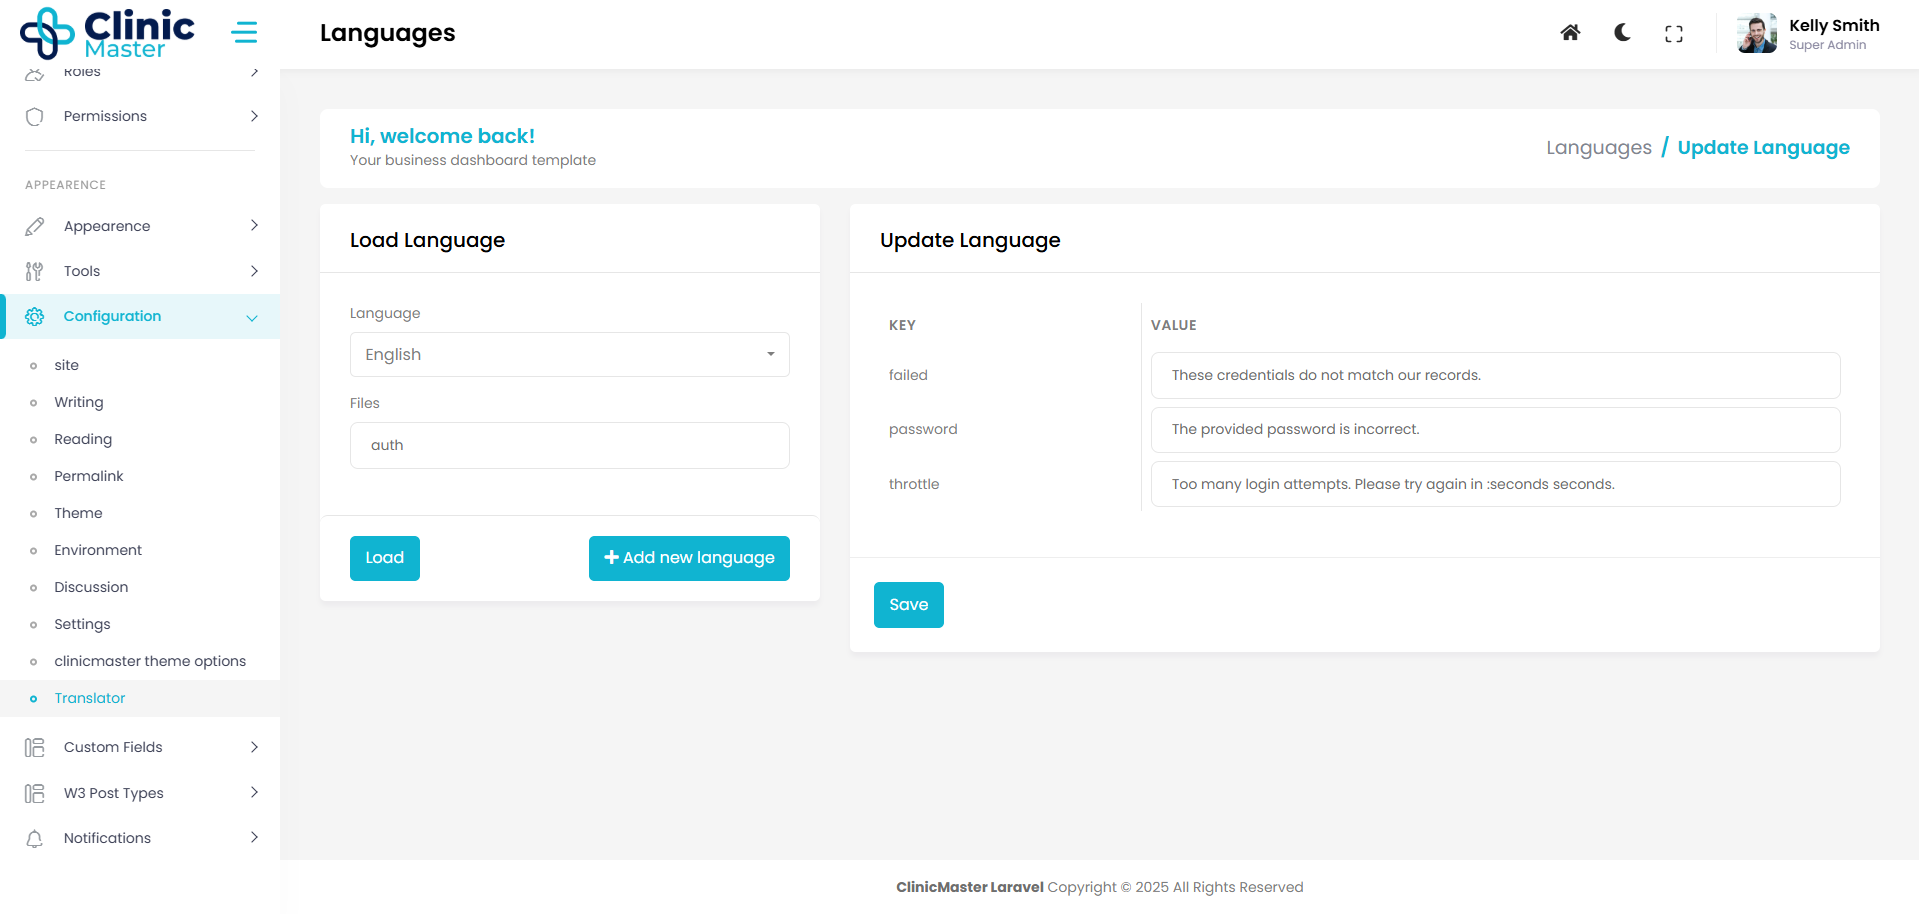
To understand how it works, please watch the video below.
Theme Manger
ClinicMaster added theme installation functionality like wordpress.
- Upload theme zip file and install with this theme manager panel.
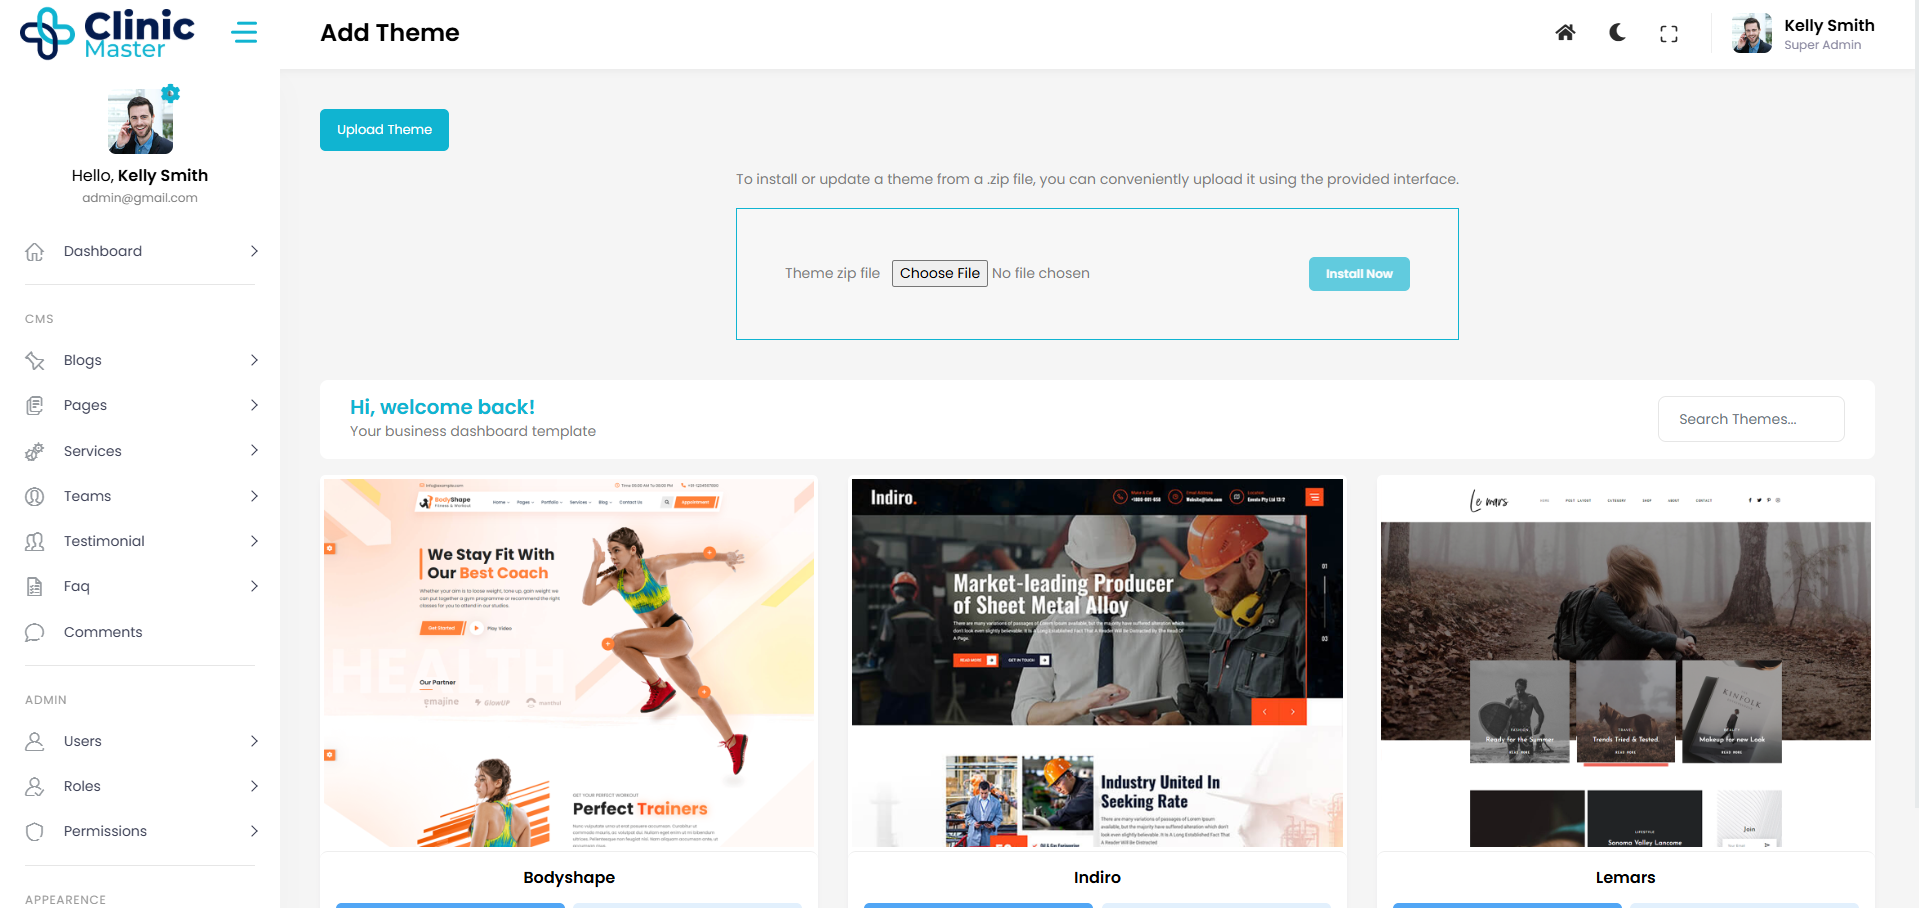
- You can install and active theme.
To understand how Theme Manager works, please watch the video below.
The Basics and Modules System -
How it's work ?
here we see how To Manage Our CMS System. There are some simple steps to Manipulate Anything by Our Wish.
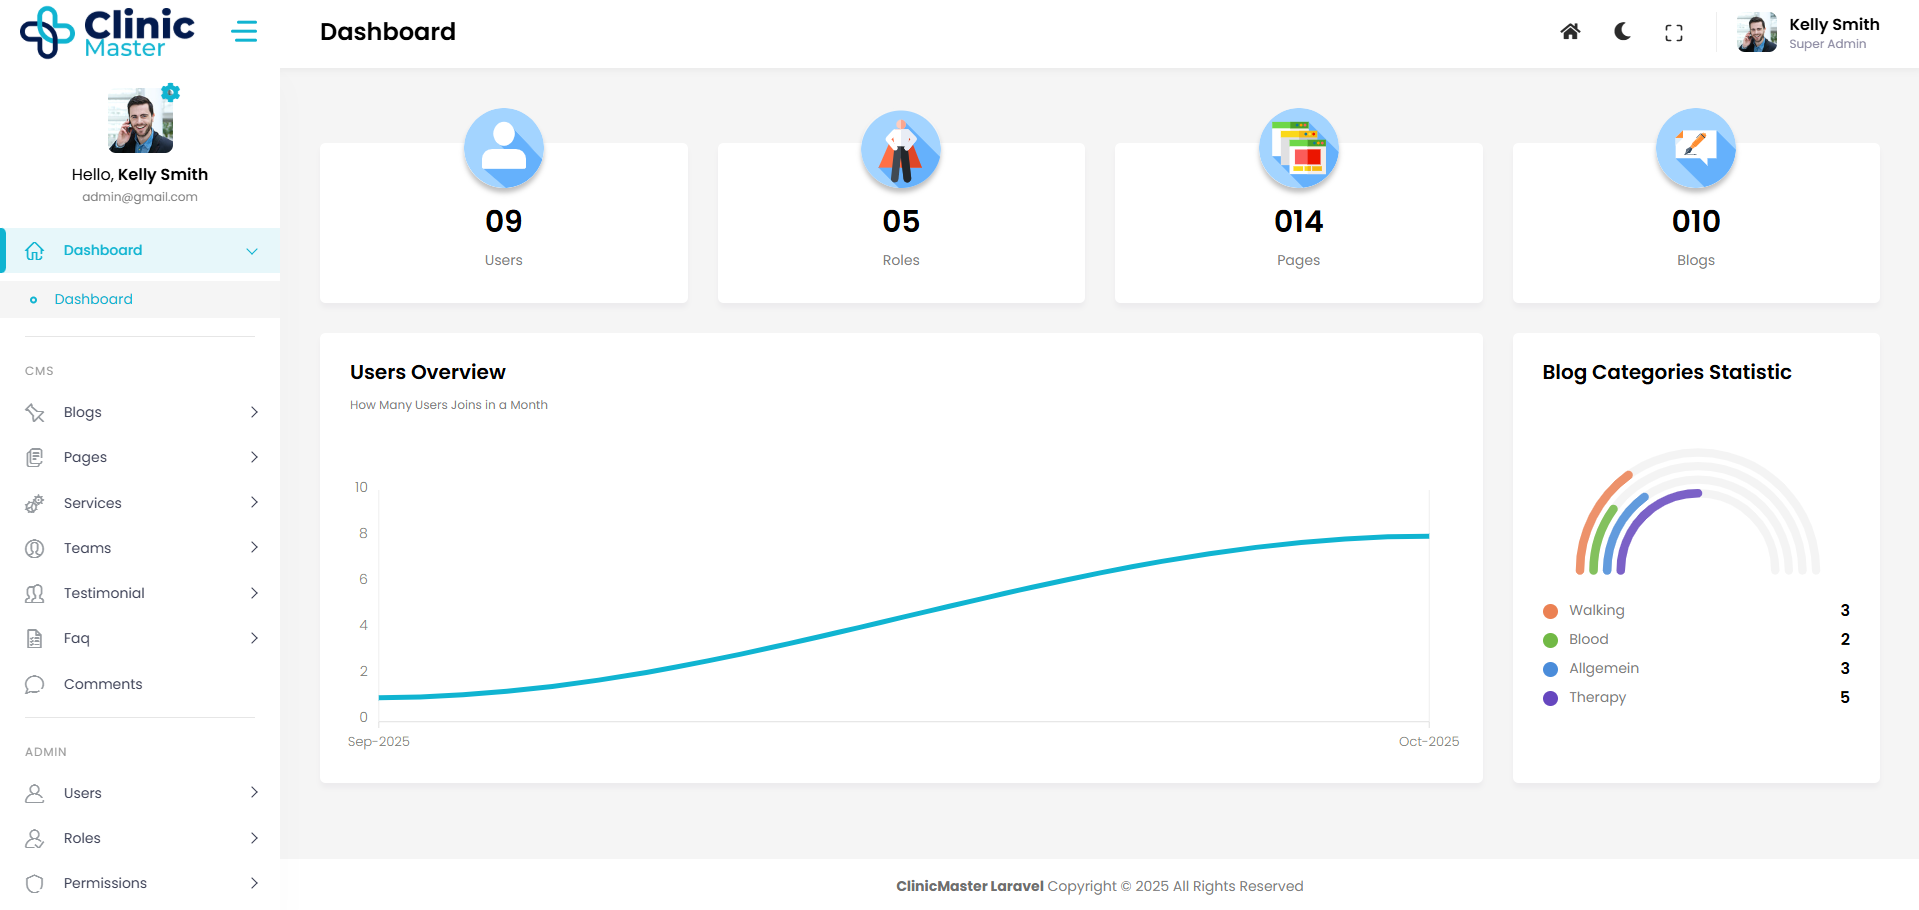
- Control Panel
You can access the control panel by heading to https://yourdomain.com/admin.
The Control Panel for W3CMS is a web GUI (graphical user interface) that provides a comfortable way to manage your application. The W3CMS control panel is Very Simple, easy to use and not overwhelming. Power users will love the workflow shortcuts and new users will appreciate the simplicity and organization.
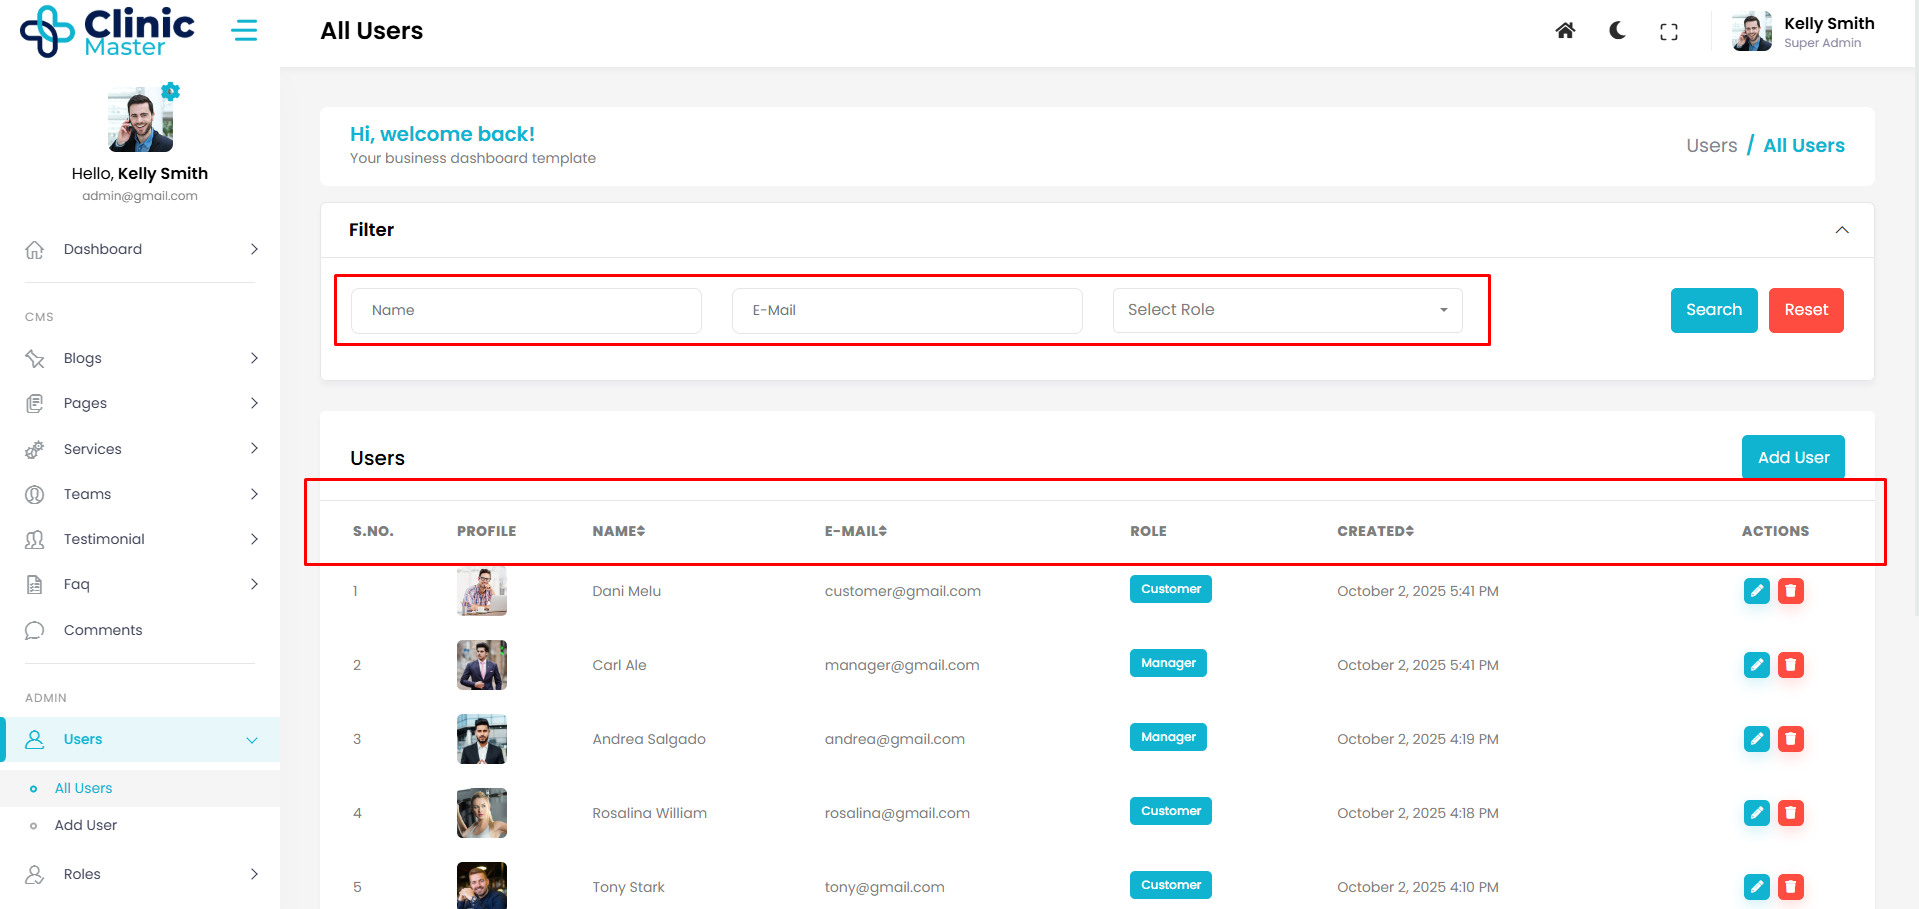
- User Module
User Module is a system for easily manage all Details of your user accounts such as changing user properties, reset passwords and also You have the ability to add, edit, and delete users. You can also search, sort, and filter your user data and modify user information, all in the same place. Like :-
- Registration
- Authentication
- Login Throttling
- Users & Roles Management
- Users Permissions
- Integrated with Laravel's Auth service.
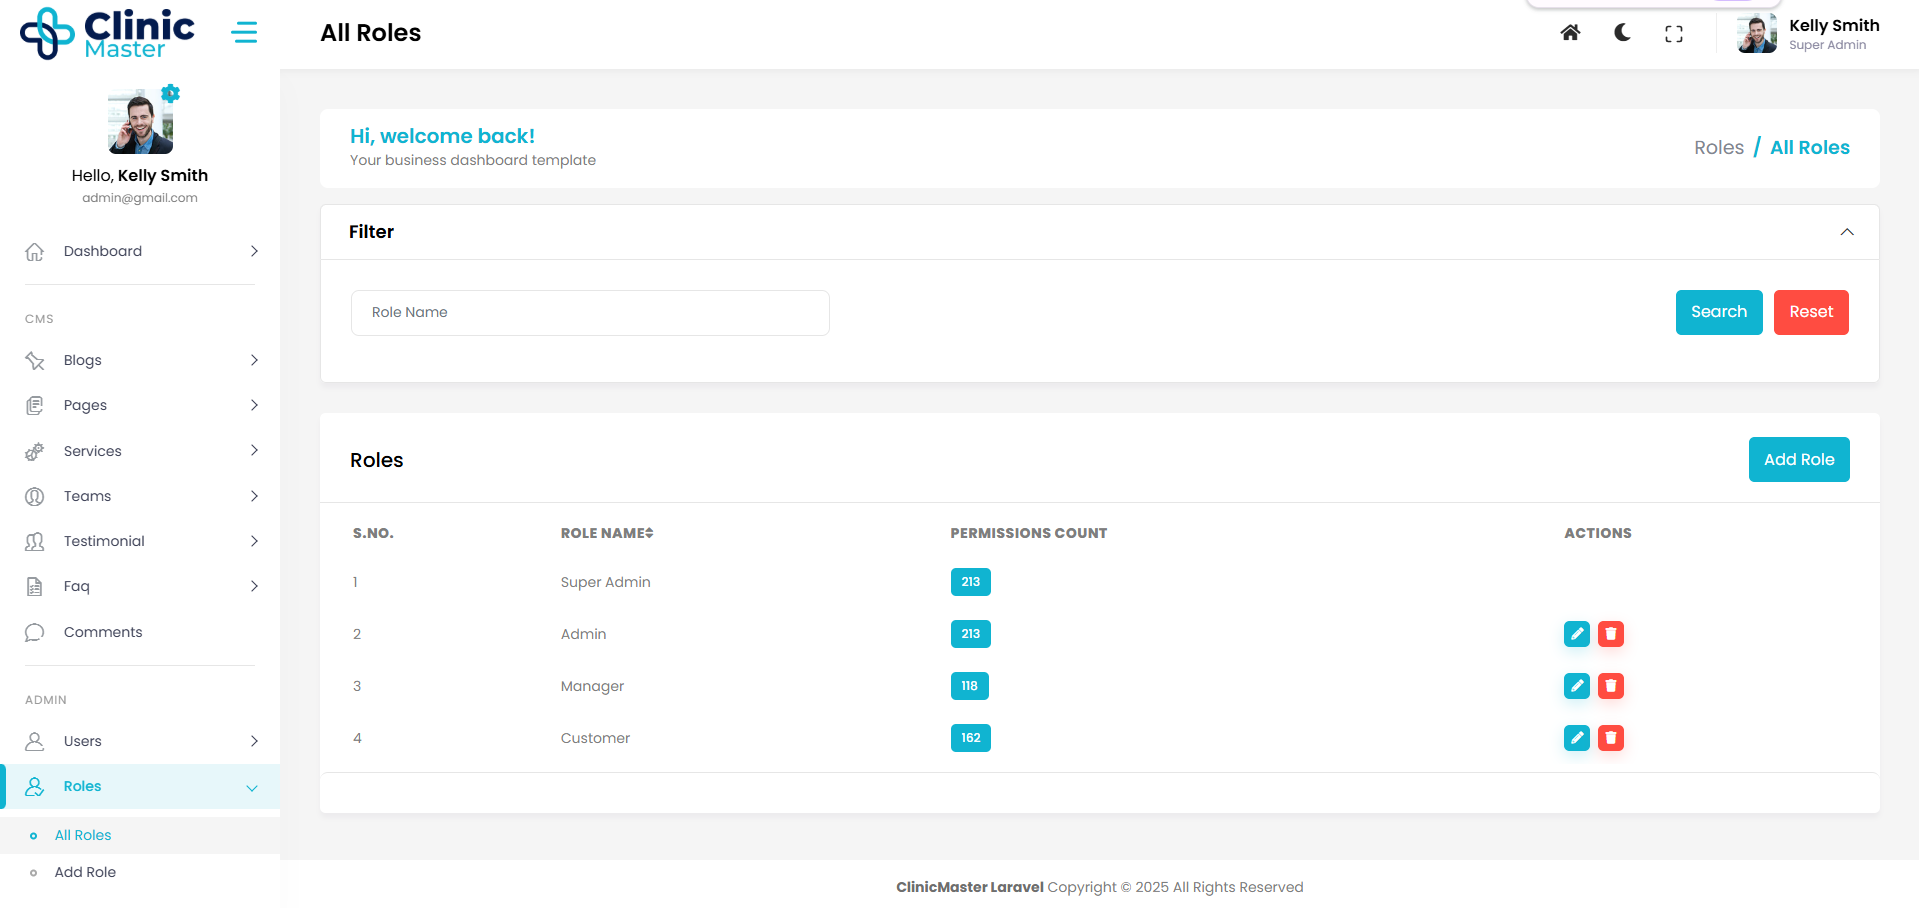
- Roles Module
A role is just a collection of permissions, Roles provide a way for administrators to group permissions and assign them to users or user groups. Permissions define the actions that a user can perform. in The Roles Module You have the ability to add, edit, and delete Roles. You can also search, sort, and filter your Roles data and modify Roles name, all in the same place.
- Permissions Module
Permissions Module contains all of the permissions that apply to an individual role or user. It can contain allowed and denied permissions, as well as many permission sets so that it can faithfully make a secured enterprise system.Permissions specifies who or what is allowed to access the object and what operations are allowed to be performed on the object.
There are 4 ways to Manage Permissions.
- 1. All Permissions
- 2. All Temp Permissions
- 3. Roles Permissions
- 4. Users Permissions
1. All Permissions
in All Permissions There are two ways to manage permissions, Role Based permissions and User Based permissions.
A. Role Based Permissions for give access(permissions) to a role.
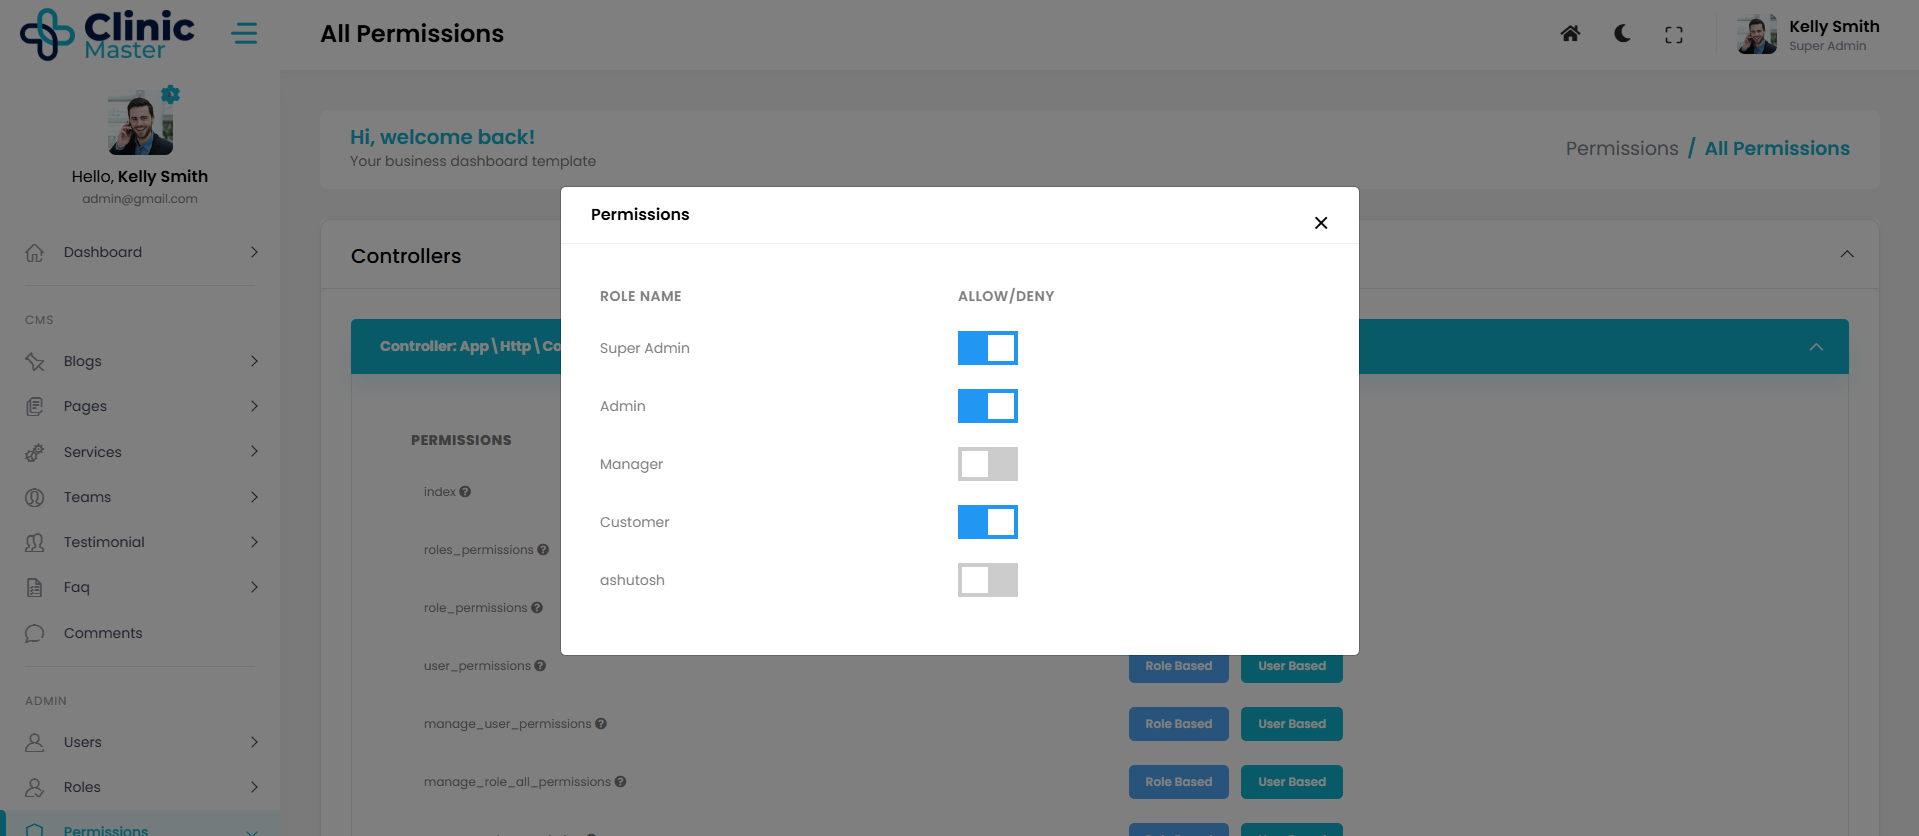
B. User Based Permissions for give access(permissions) to a user.
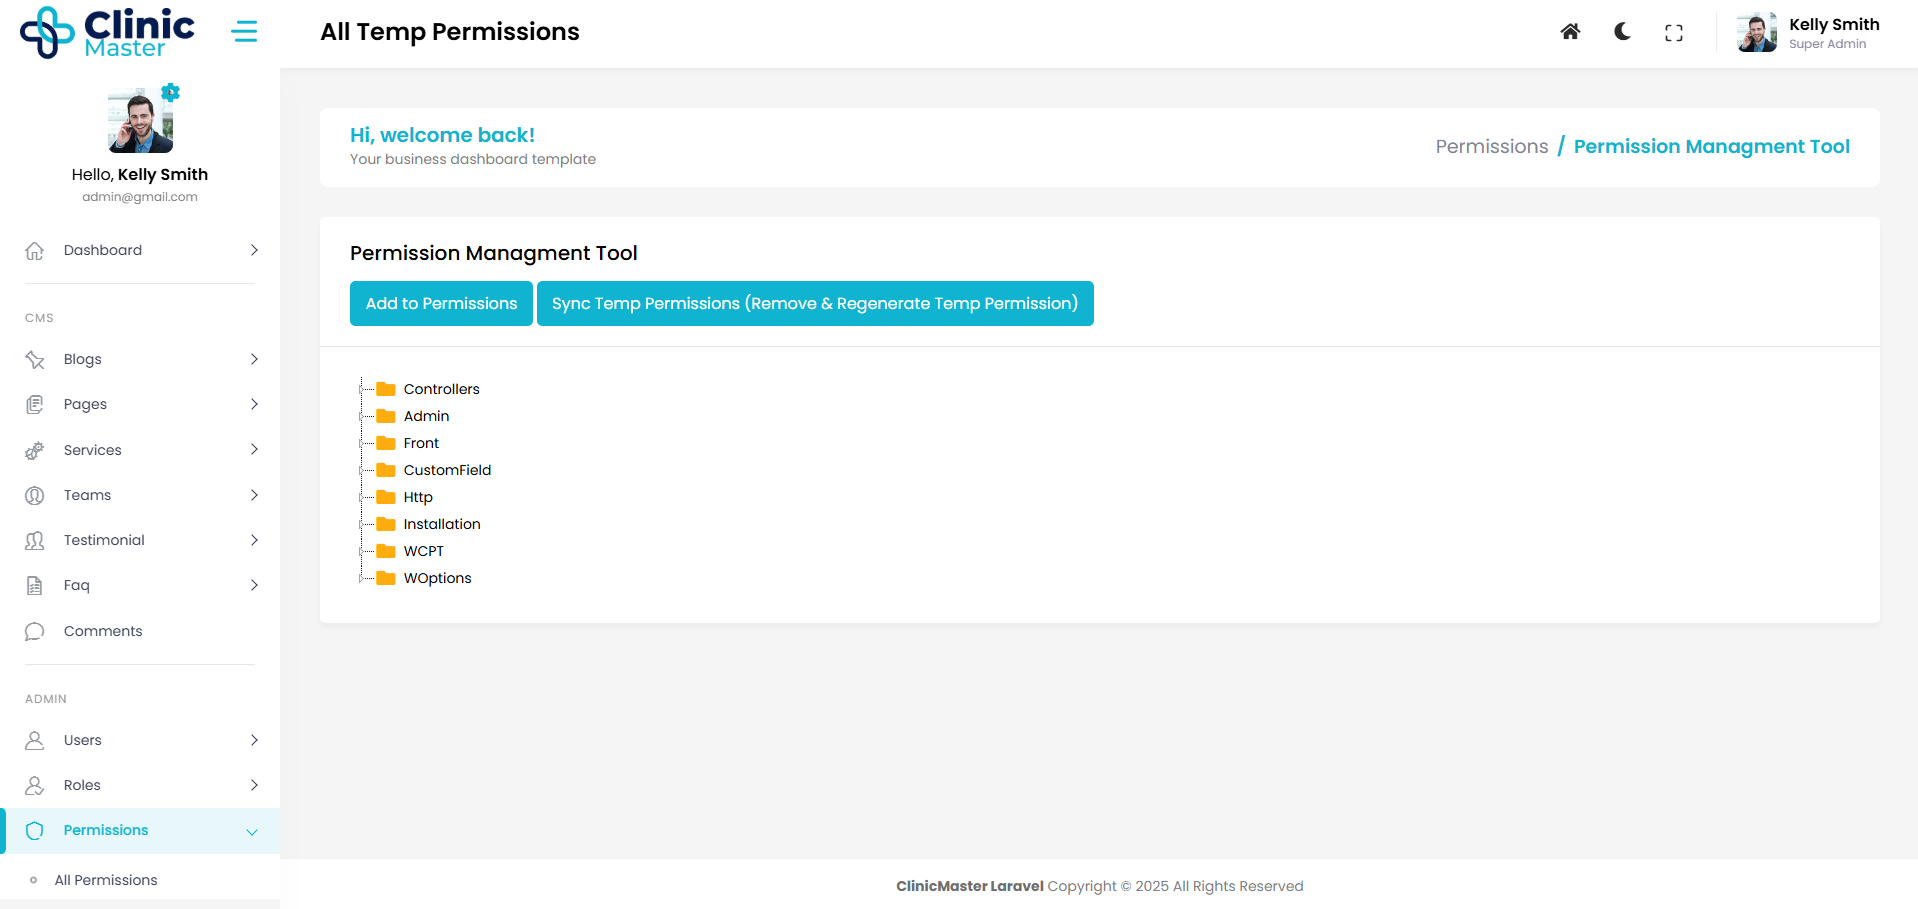
2. All Temp Permissions
All Temp Permissions can reset All the permissions to default. it can remove and regenerate All permissions.
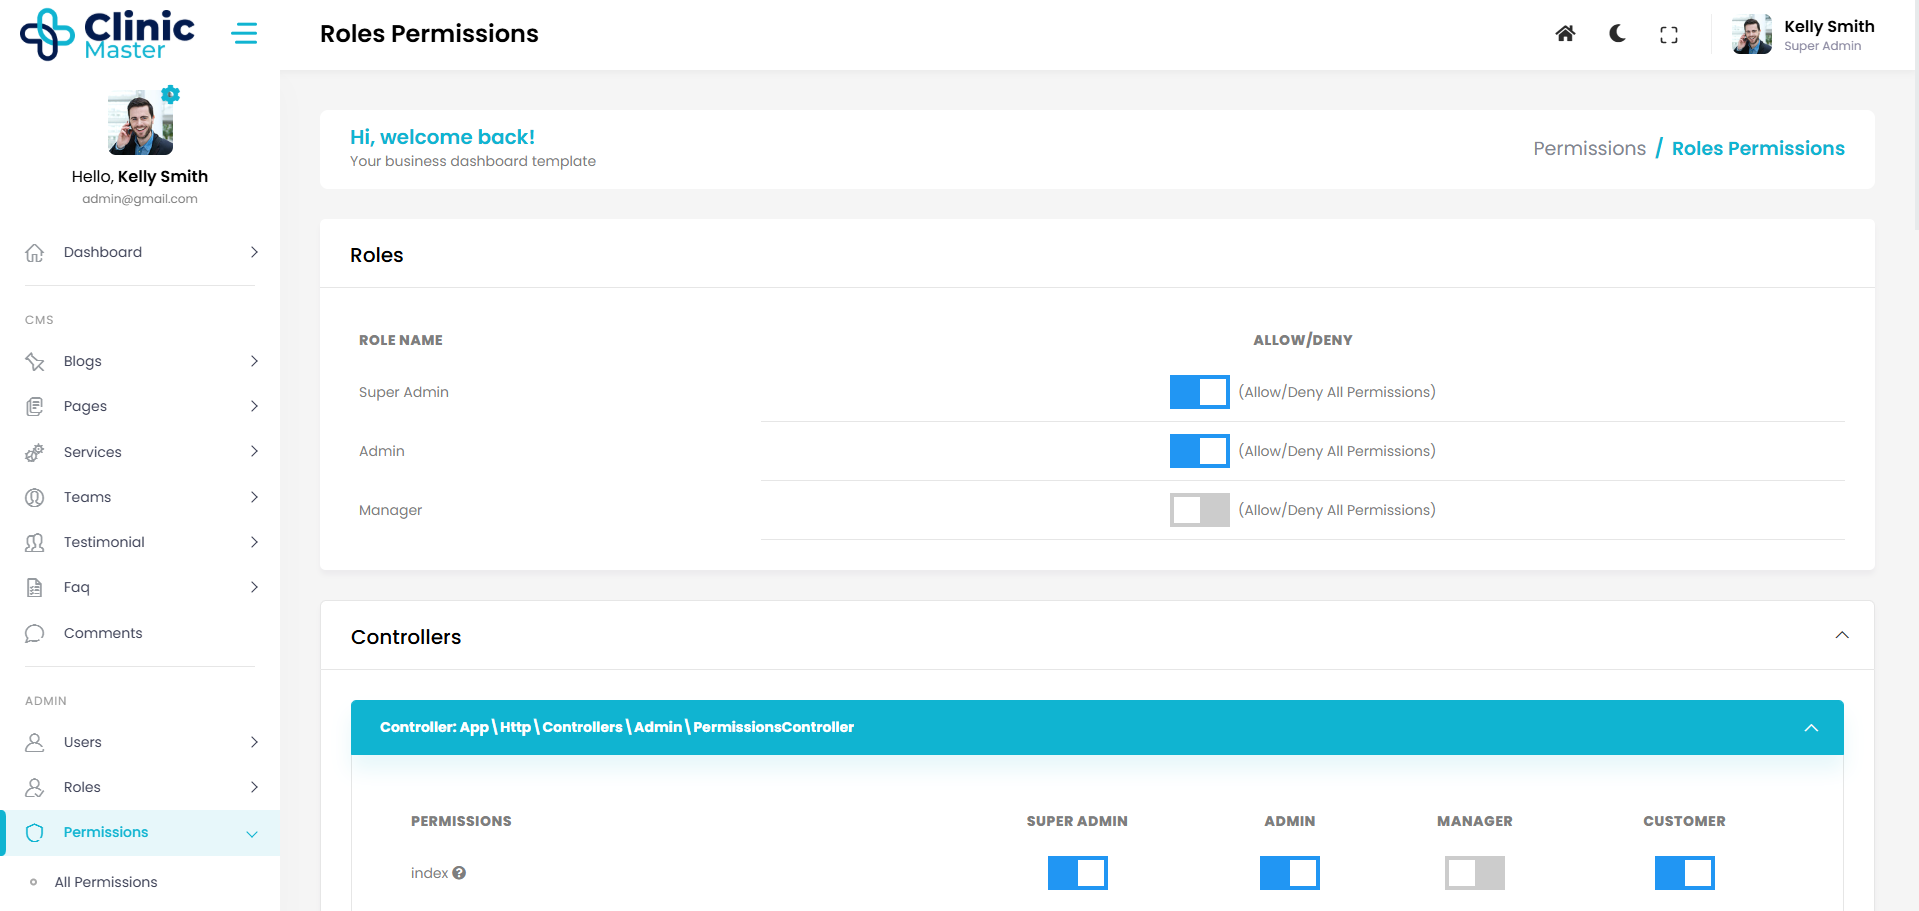
3. Role Permissions
Role Permissions can give give access(permissions) to a Role.
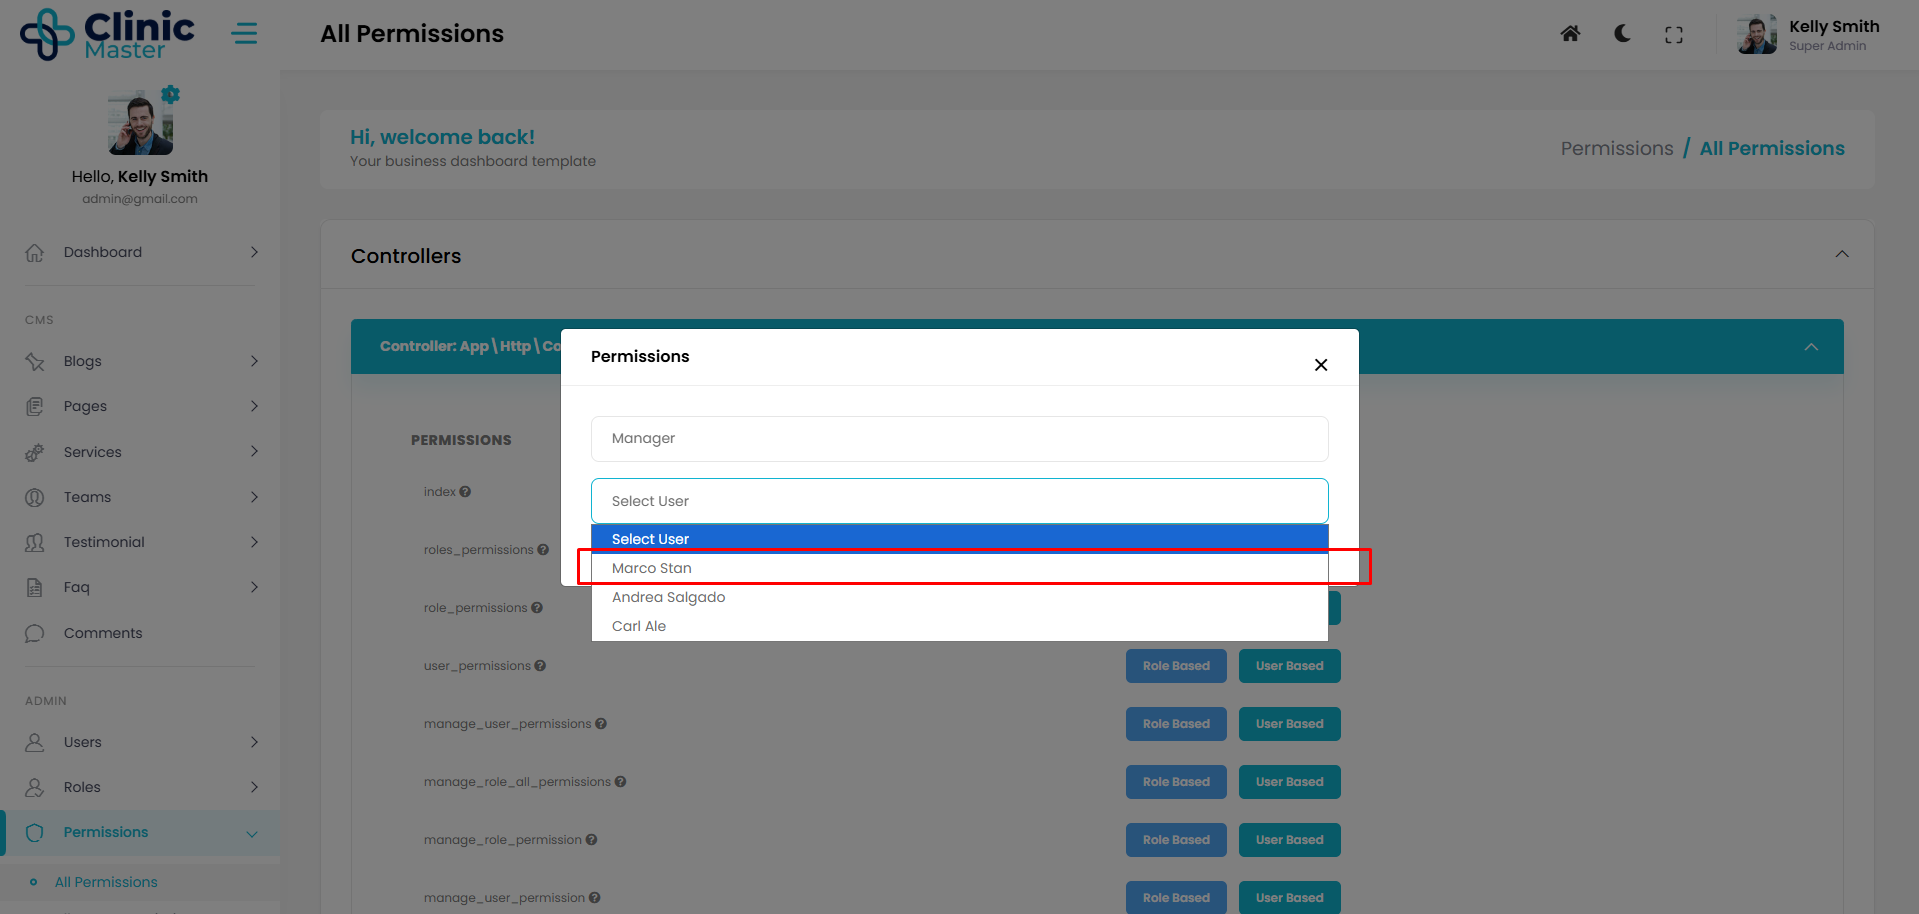
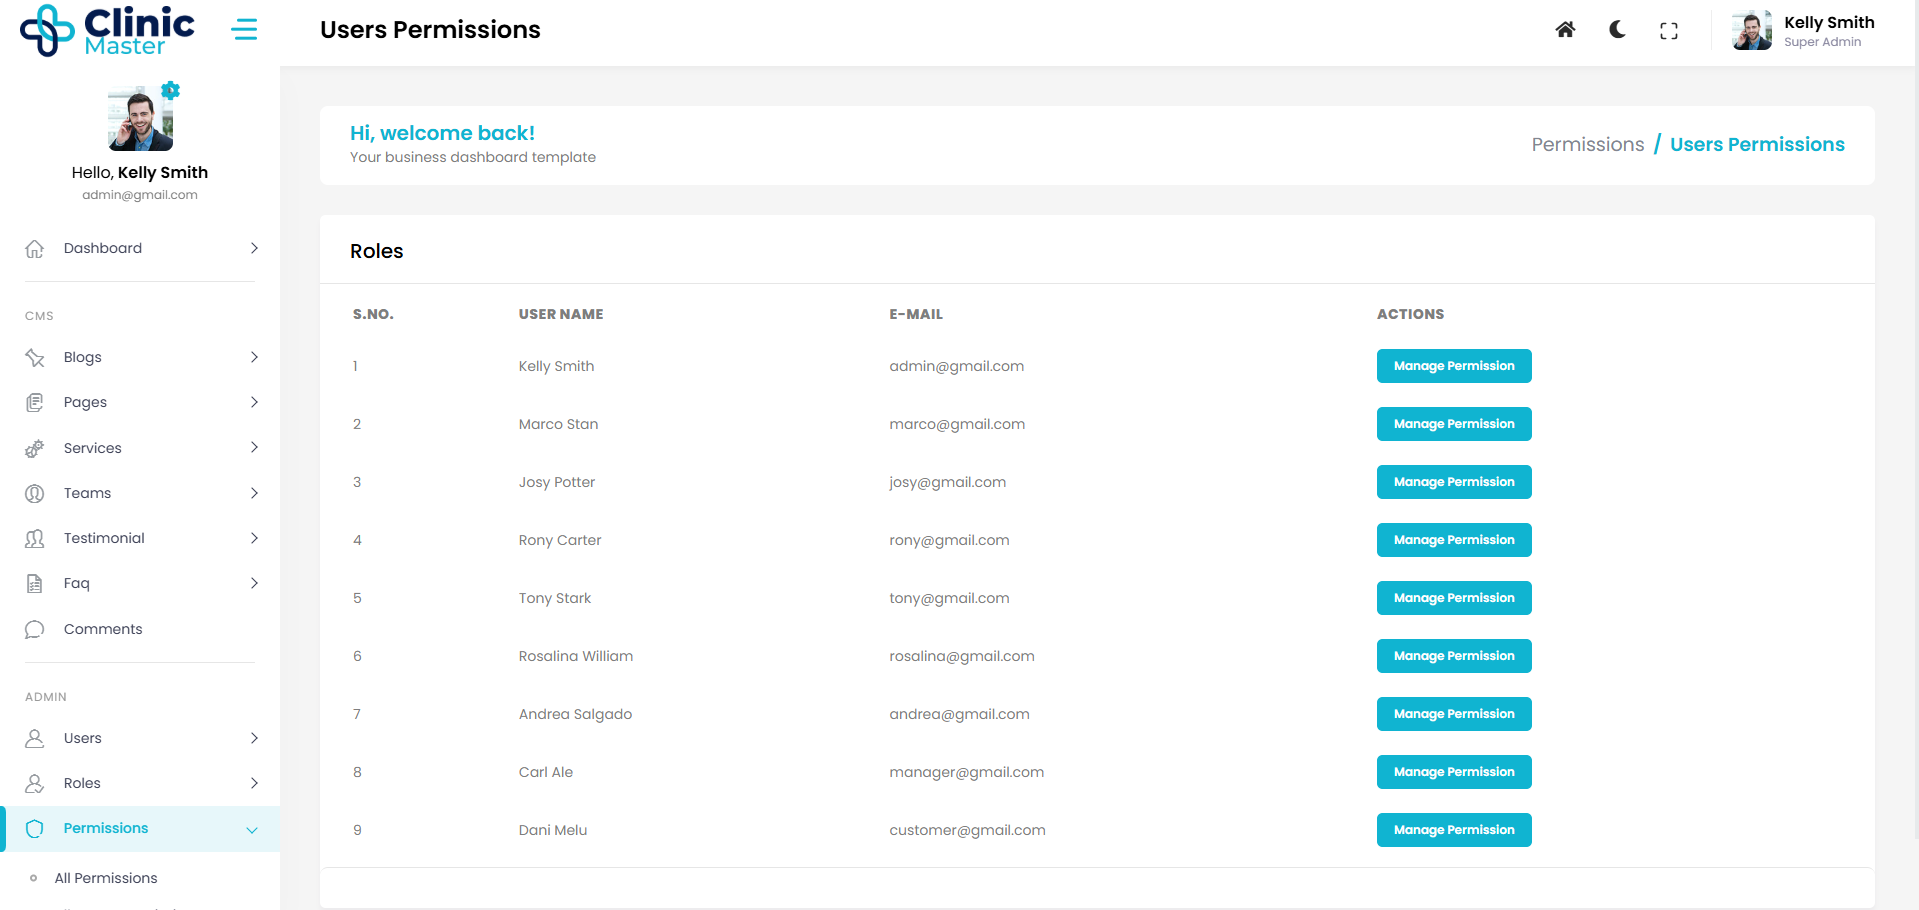
4. User Permissions
User Permissions can give give access(permissions) to a User.
- Configuration Module
The Configuration Module gives Users the ability to access all the Backend and Frontend functionality of the app. Along with accessing this information, developers can further customize the backend functionality of their application.
Here, you can update Site Title, set the format of Date Time and do many more things.
All The Settings has been saved in config file And Configuration Table of Database.
There are 7 types of configurations.-
1. Site Configurations
- Site Title
- Site Tagline
- Site Email
- Site Status (If Disabled then Frontend site go on Maintenance Mode).
- Site Copyright Text
- Site Footer text
- Site Coming soon (If Enabled then Frontend Site show Coming Soon Page).
- Site Contact
- Site Site Favicon
- Site Maintenance Message
- Site Coming Soon Message
- Site Text Logo
- Site Comingsoon date (Set The Timing Of Coming Soon Page).
- Site Biography
- Site Location
- Site Office time
2. Writing Configurations
- Enable WYSIWYG editor
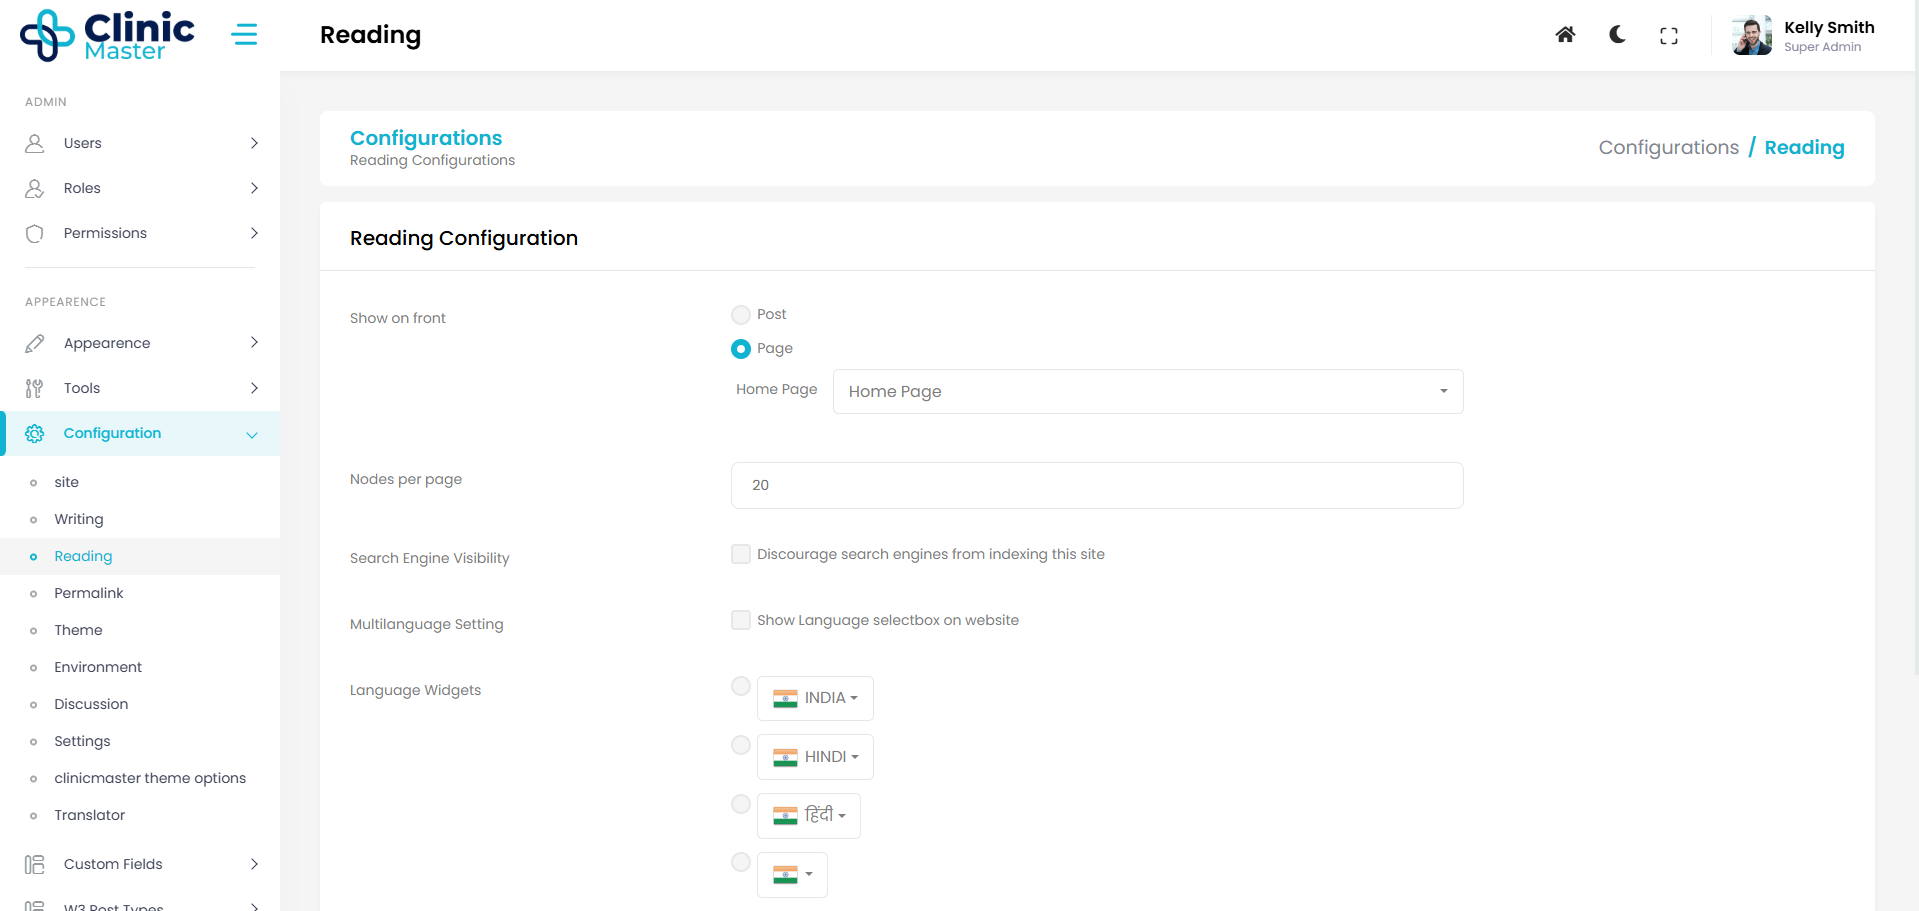
3. Reading Configurations
- Nodes per page (For Showing Total Data on single Page.).
- Date time format
- Show on front (What You Want to show on homepage A single Page or Blogs Listing).
4. Social Configurations (Social media links)
- Instagram Url
- Whatsapp Url
- Facebook Url
- Twitter Url
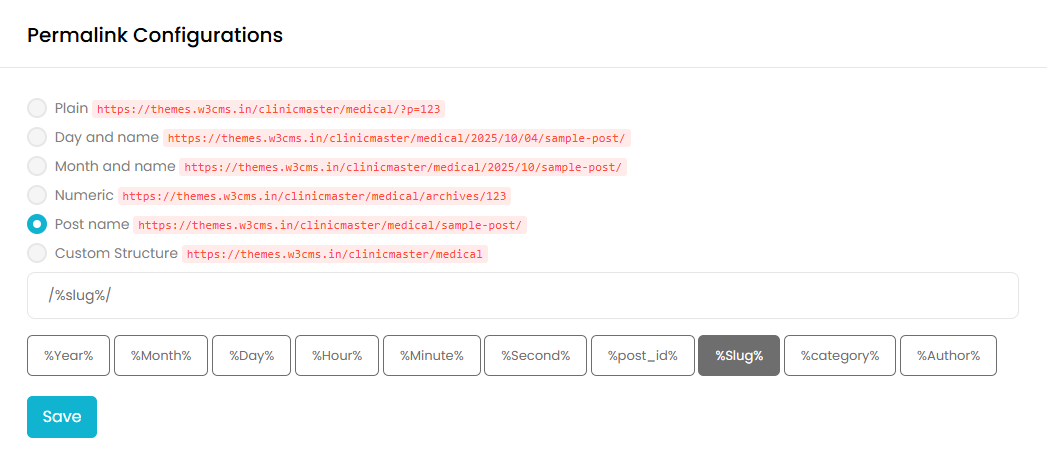
5. Permalink Configurations
Permalink Configurations can edit The Urls of Your Blogs For Frontend Site.
6. Widget Configurations
Widget Configurations Set Widgets you want to show on sidebar of the Frontend Site.
- Show sidebar
- Show recent post widget
- Show category widget
- Show archives widget
- Show search widget
- Show tags widget
7. Theme Configurations
Theme Configurations Set Theme for the Frontend Site. Currently There is only two Options.
- Default
- Theme 1(BodyShape).
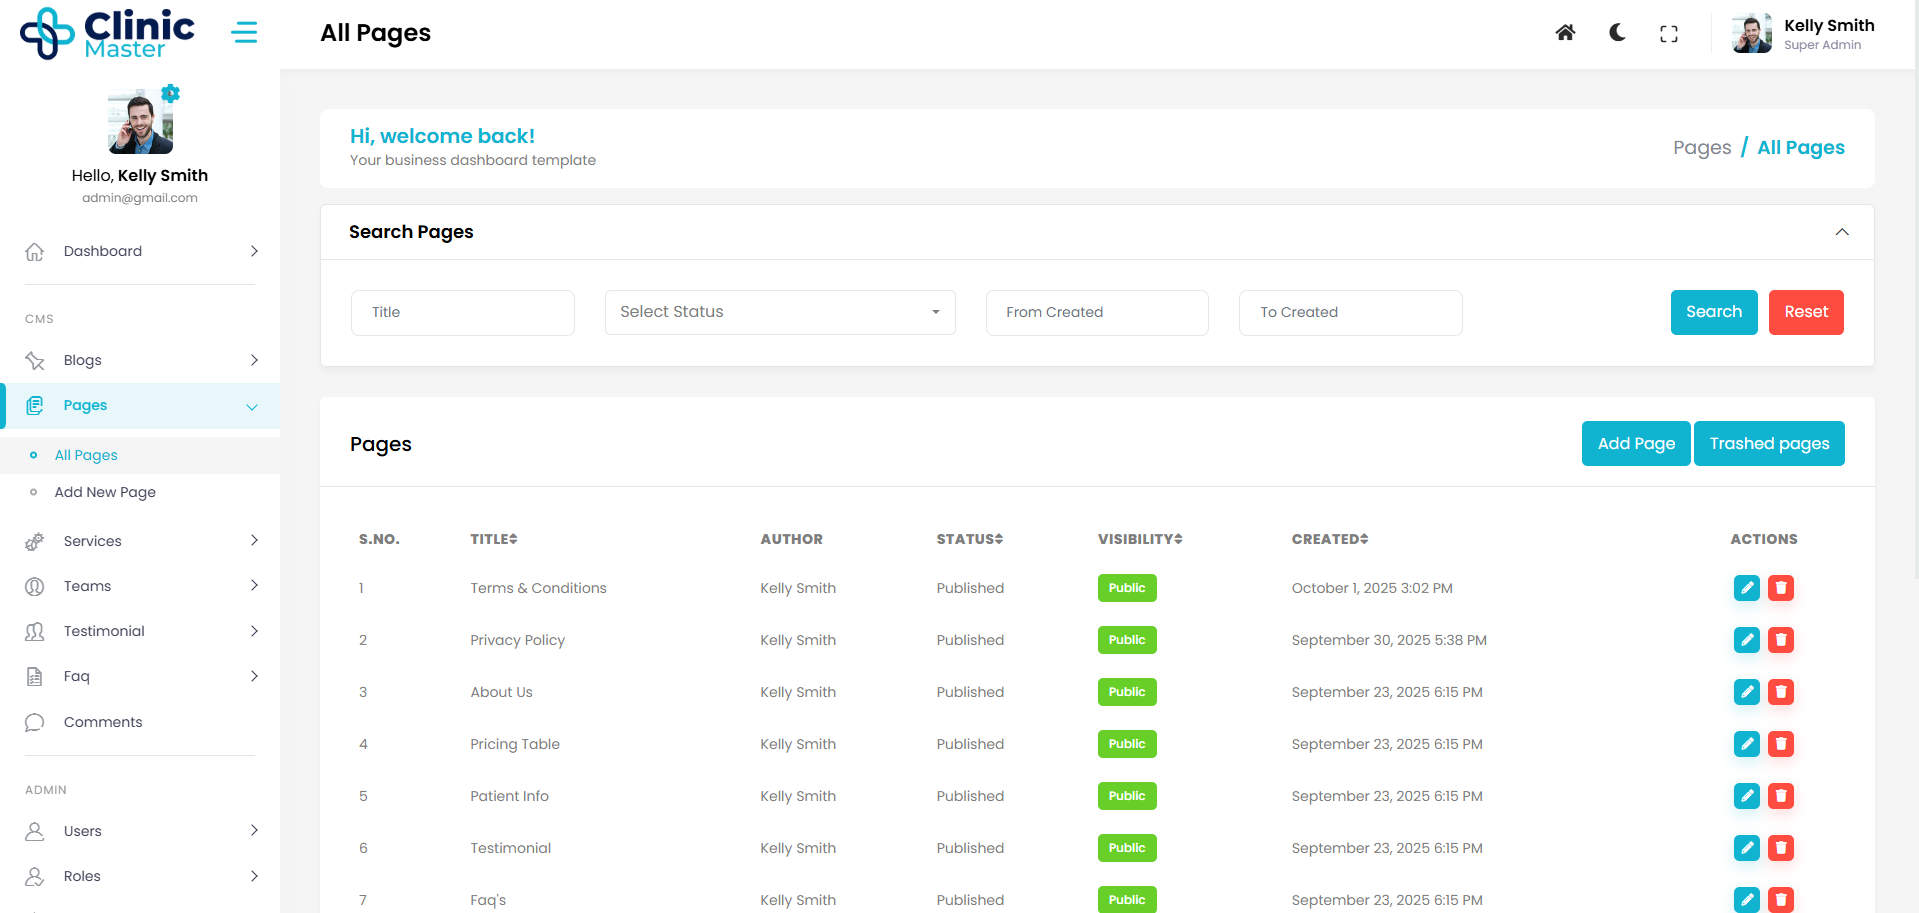
- Page Module
Page Module provides Many page facilities Like Wordpress. In the 'All Pages List' Users also search, sort, filter and edit your Page data, all in the same place. There Is an interesting thing in page 'wysiwyg ckeditor' with this You can also code in page content
There are fields of Page.
- Page Title
- Page Content (With Source code editing)
- Page Status (Published, Draft, Private, Pending)
- Page Visibility (Public, Password Protected, Private)
- Page Attributes (Parent Page Functionality)
- Page Featured Image
- Page Excerpt( Short Description of Page)
- Page Slug( Page URL as Your wish)
- Page Author
- Page Custom Fields (You can also add new Field as your wish)
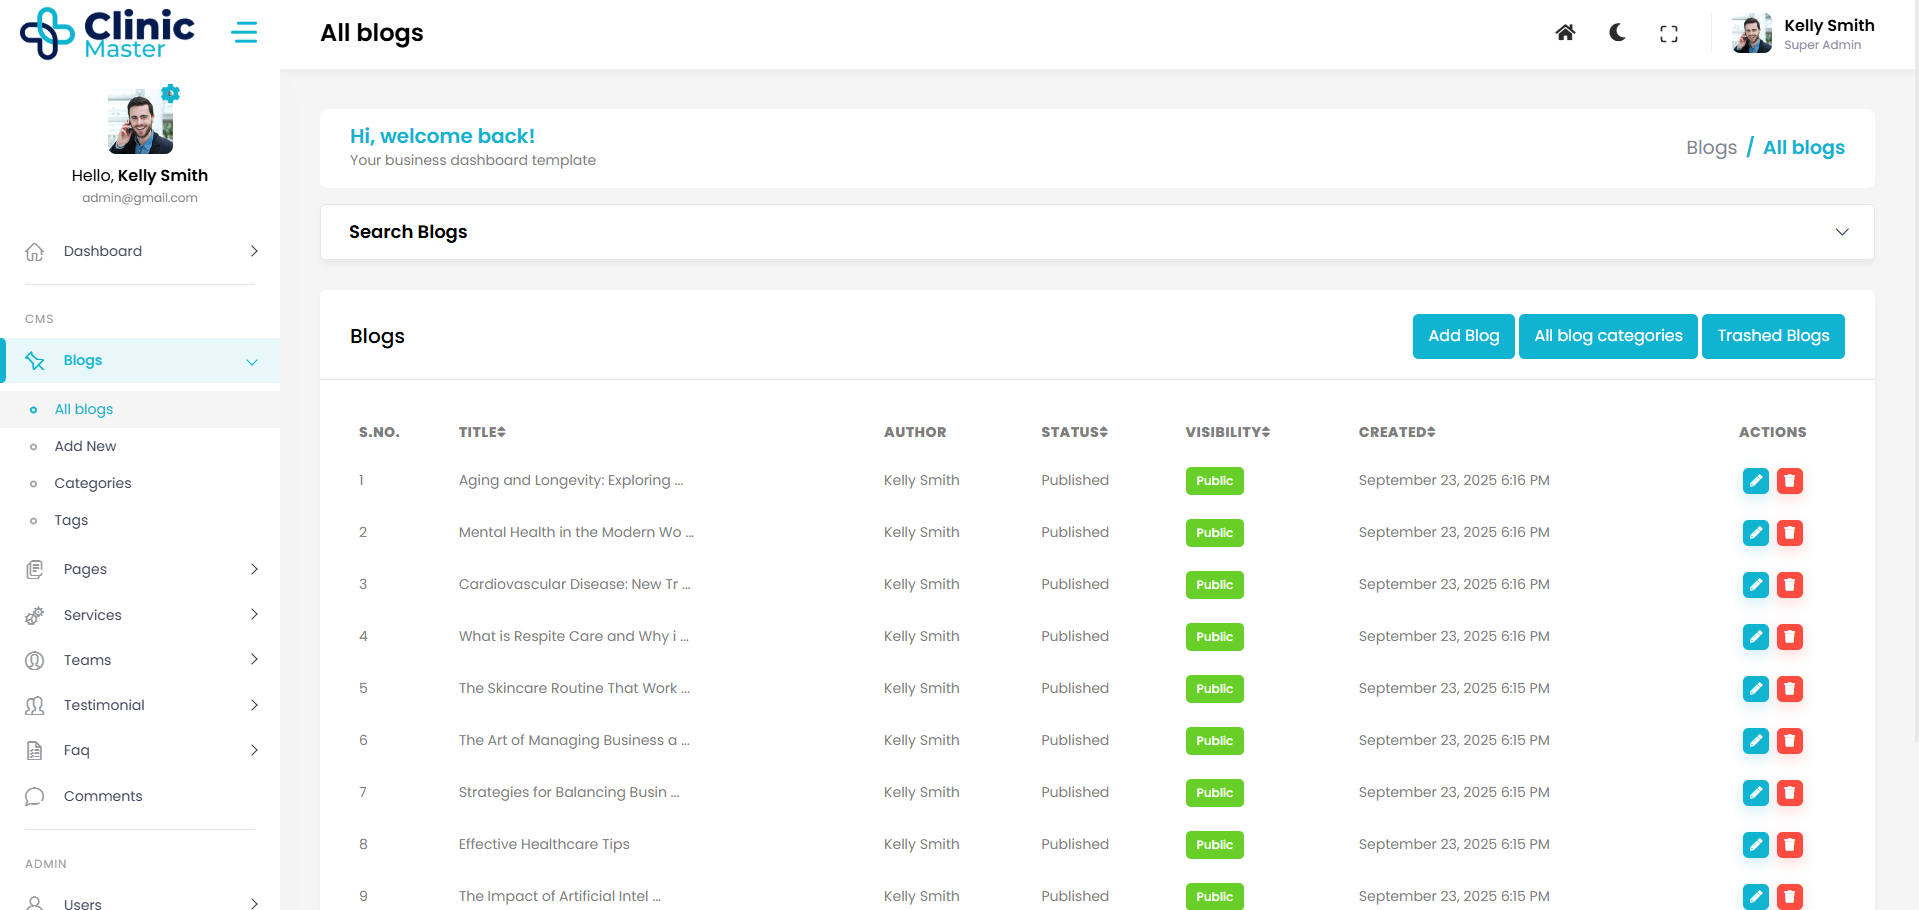
- Blog Module
Blog Module provides Many blog facilities Like Wordpress. In the 'All Blogs List' Users also search, sort, filter and edit blog data, all in the same place. There Is an interesting thing in blog 'wysiwyg ckeditor' with this You can also code in blog content
There are fields of blog.
- Blog Title
- Blog Content (With Source code editing)
- Blog Status (Published, Draft, Private, Pending)
- Blog Visibility (Public, Password Protected, Private)
- Blog Categories
- Blog Tags
- Blog Featured Image
- Blog Video ( Youtube Video Link)
- Blog Excerpt( Short Description of Blog)
- Blog Slug( Blog URL as Your wish)
- Blog Author
- Blog Custom Fields (You can also add new Field as your wish)
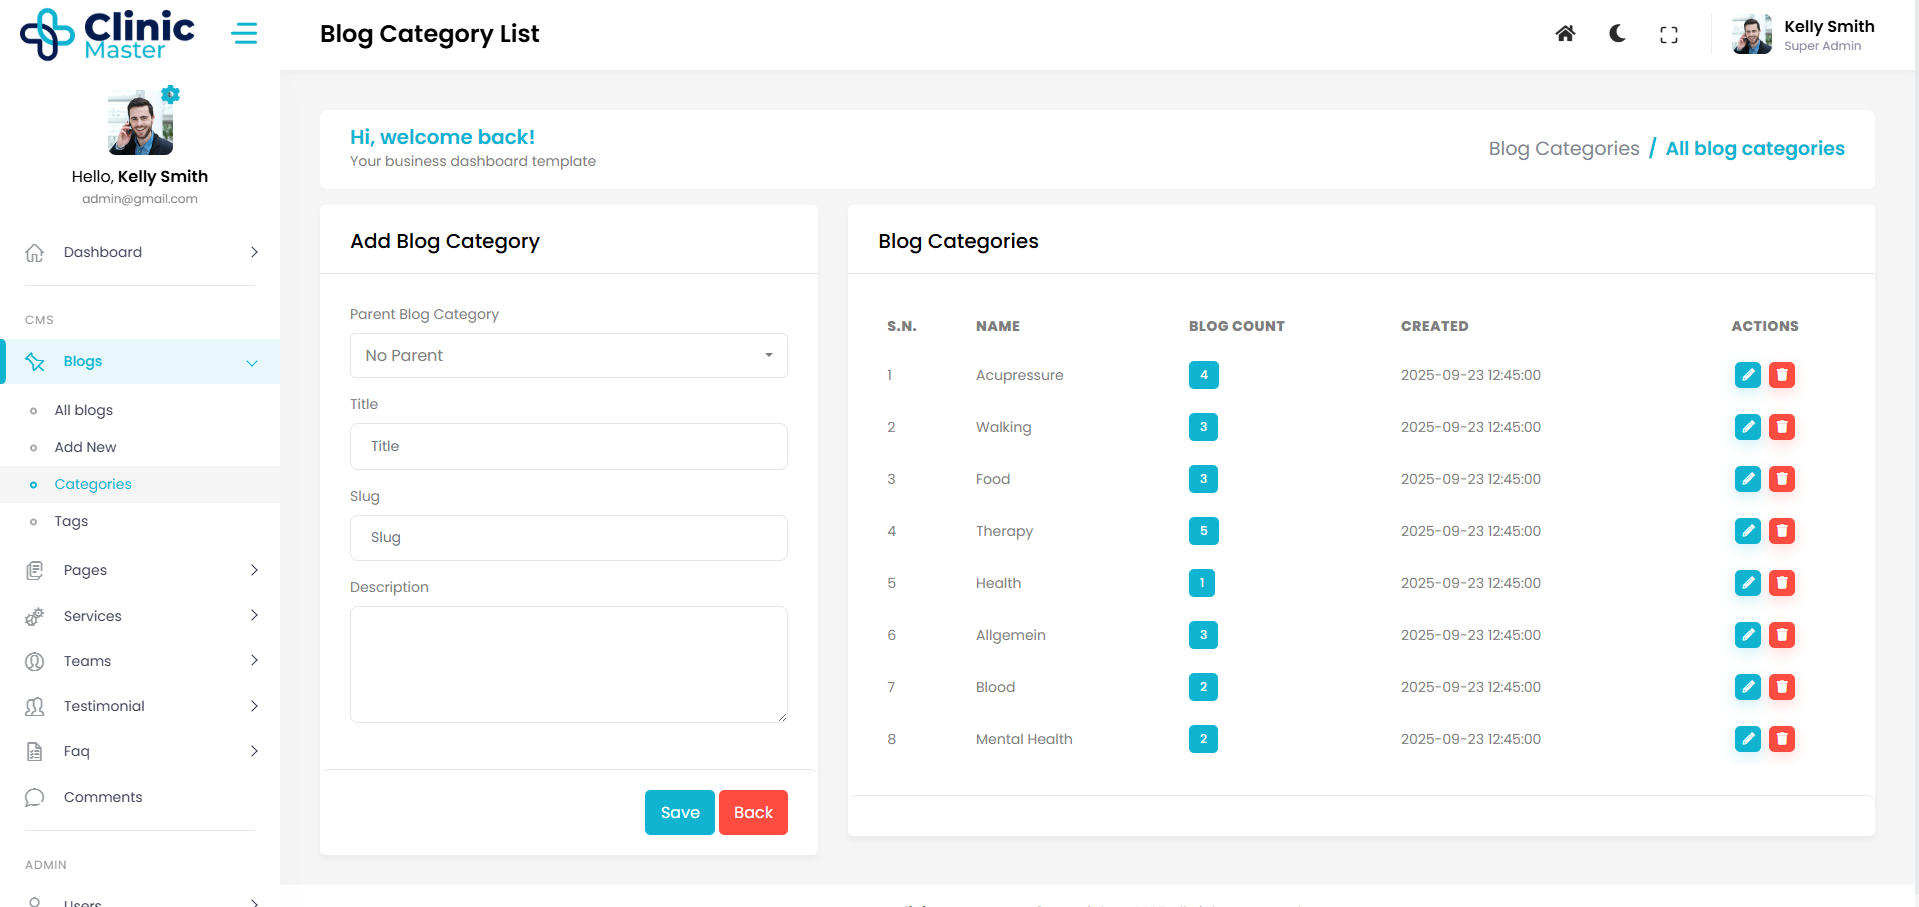
- Blog Category Module
Blog Category Module provides Many blog category facilities Like Wordpress. In the 'Advance View' Users also search, sort, filter and edit Blog Category data, all in the same place.
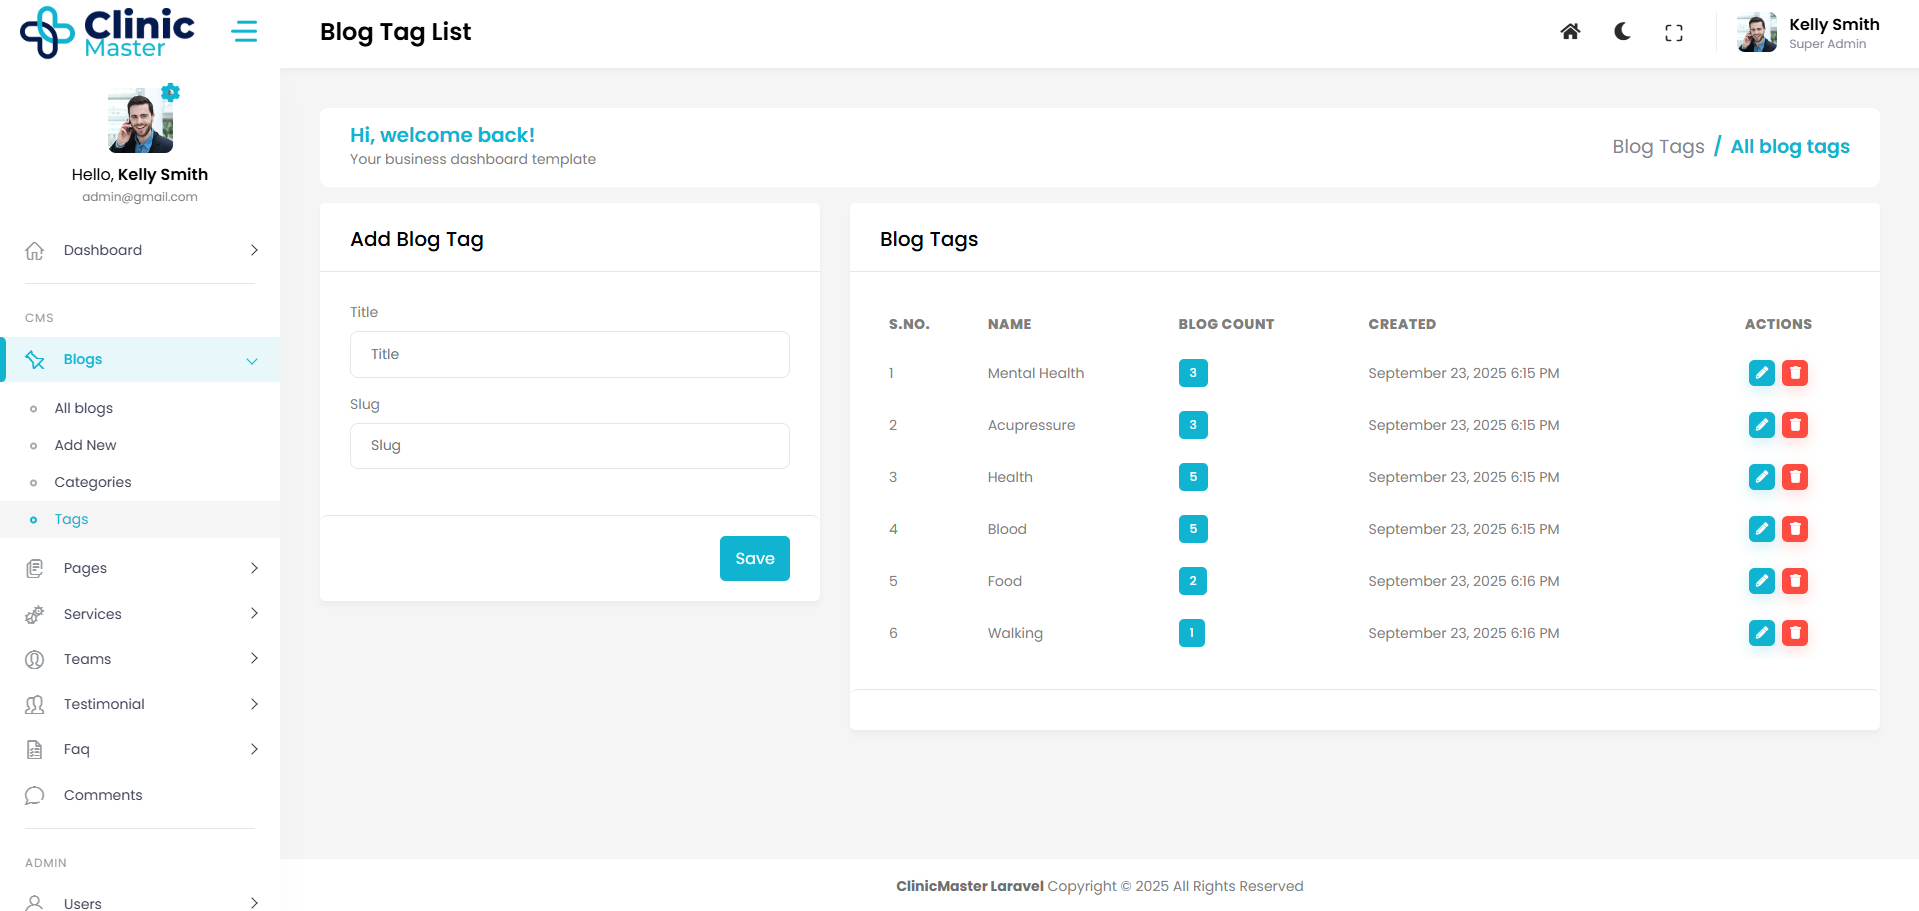
- Blog Tags Module
Blog Tags Module provides Many blog tags facilities Like Wordpress. In the 'Advance View' Users also search, sort, filter and edit Blog Tags data, all in the same place.
- Menus Module
Menus Module provides information about the Menus in CMS Frontend Site.
Menus are a collection of links (menu items) used to navigate a website. Menus are primarily displayed as a hierarchical list of links using Menu Locations.Menus can be "flat" or may be hierarchical (multilevel) A multilevel menu has one or more “leaf” menu items.
There are some easy steps to modify Menu in CMS.
- 1. Create a Menu
- 2. Add Items to Menu
- 3. Customize and Delete Menu Item
- 3. Add Menu To The Location in Site
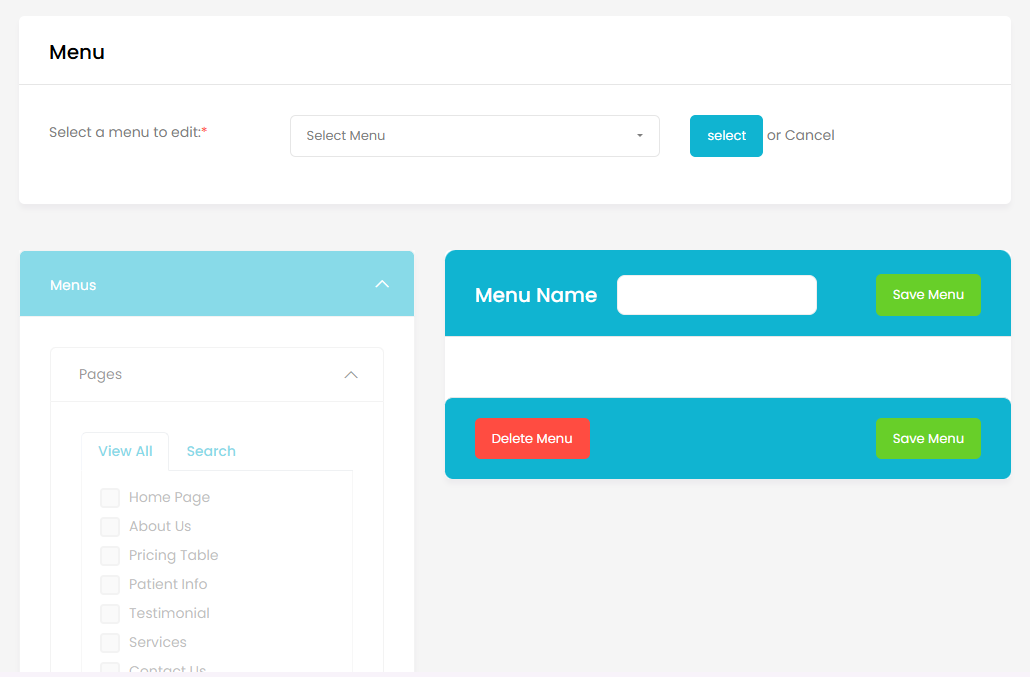
1. Create a Menu
Defining a Menu is very easy,
- Just click on "create new menu".
- enter a menu name in input and click on "Save Menu" button to save the menu.
- You can easily select existing menu By clicking on "Select" button.
- Then start Customizing Your Newly created Menu.
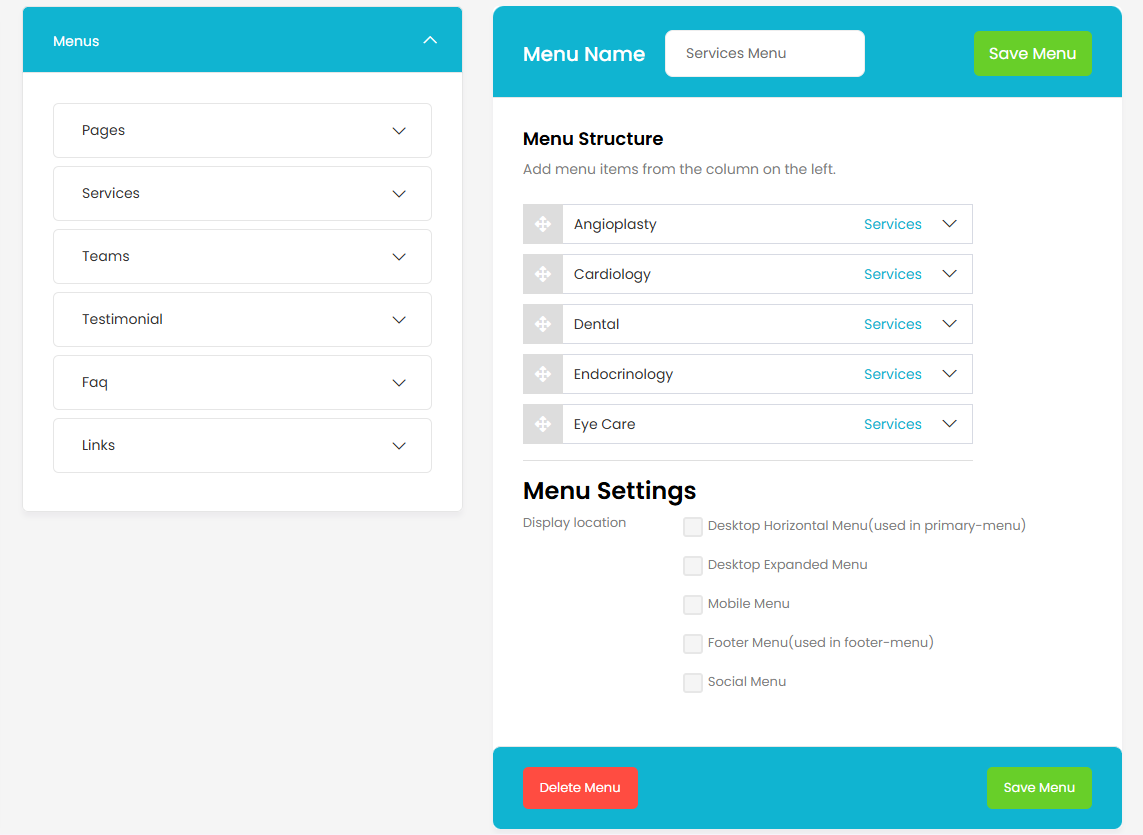
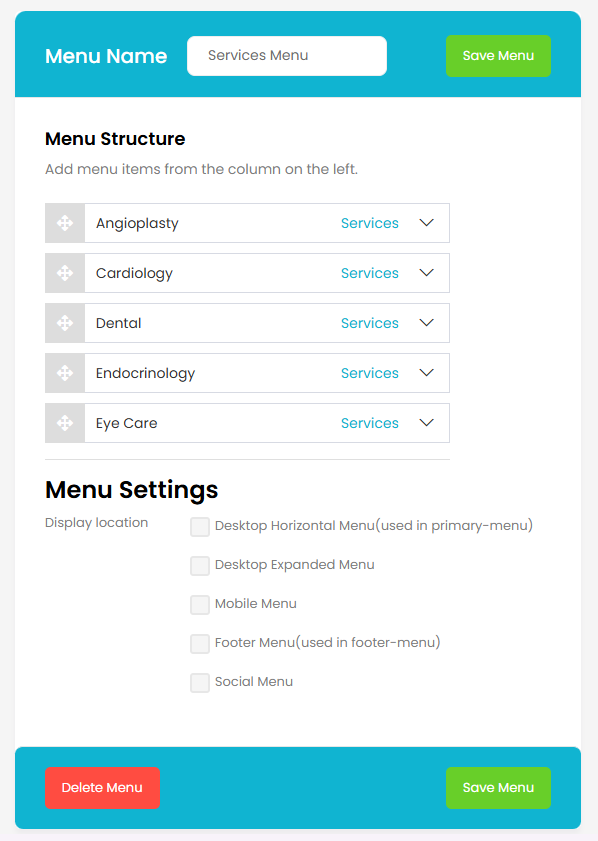
2. Adding menu items to a menu
Just Imagine you are creating a new "Contact Us" page and wish to have a menu item in your main menu so that visitor can click this link to find How to Contact with you.
- Just click on "Pages" Accordian.
- click on the "View All" link to bring up a list of all the currently published Pages on your site.
- Select the Pages that you want to add by clicking the checkbox next to each Page's title.
- Click the "Add to Menu" button at the bottom of the Accordian to add your selection(s) to the menu, that you created in the previous step.
- Click the "Save Menu" button when you added all the menu items you want.
Note : Note The Screen Options allow you to choose which items you can use to add to a menu. Certain items, like Tags are hidden by default.
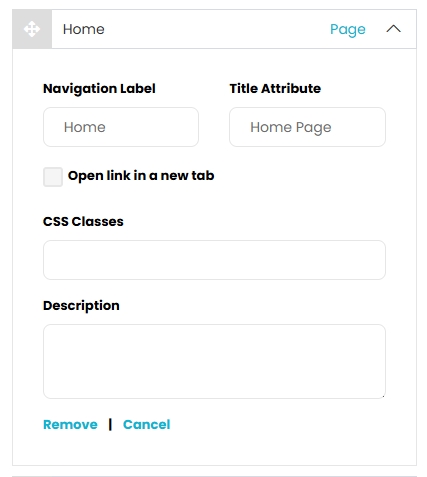
3. Customizing and Deleting Menu Items
There are some Item Customizations.
- Navigation Label : Navigation Label specifies the title of the item on your custom menu. This is what your visitors will see when they visit your site/blog.
- Title Attribute : Title Attribute specifies the Alternative ('Alt') text for the menu item. This text will be displayed when a user's mouse hovers over a menu item.
- Link Target : Select "Same window or tab" or "New window or tab" from the pulldown.
- CSS Classes : Optional CSS Classes for this menu item.
- Description Description for this link. The description will be displayed in the menu if the current theme supports it.
Deleting the Menu Item
Click on the "Remove" link at the bottom of the item box. The menu item/box will be immediately removed. Click the "Save Menu" button to save your changes.
4. Add Menu To The Location in Site
At the bottom, there is Display Locations that determine the position of menu in Frontend site.
Theme Options -
Theme Options
Now we have added a newly created W3options(Theme Options) Module system. This makes theme more Customizable with newly added options for theme like custom Header, Footer, Banner and more options for a particular page or blog. User can change almost everything in frontend site theme for a particular page or post.
So How it Work ?
its very easy to change any thing just go to the 'Theme Option' in admin under the 'Appearence' Menu, there is multiple options. these options are showing by the loop of theme options array in the theme's includes directory.
Note : Different themes have different theme options related to their designs. but below there some common theme options are mentiond to understand the working.
General Setting -
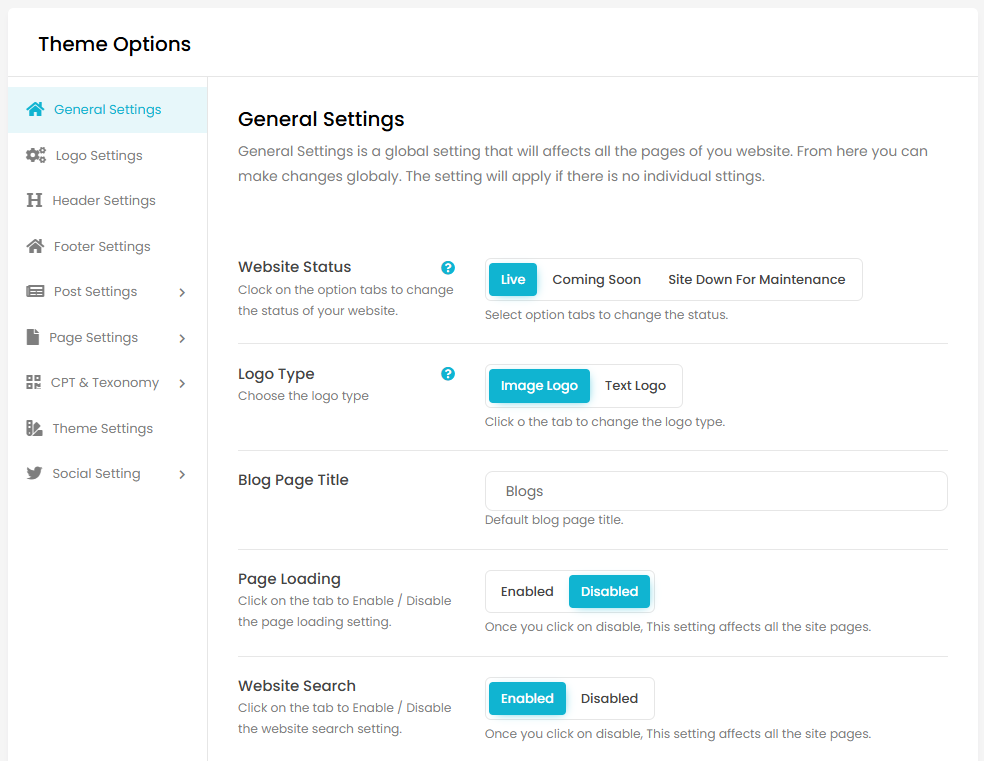
'General Setting' have many options related to general settings of theme like Website Status (the frontend site status), Logo Type (type of logo for frontend), Social Icon (enable or disable social icons in frontend), Phone Number(Show in header top), Email(Show in header top) etc.
Logo Setting -
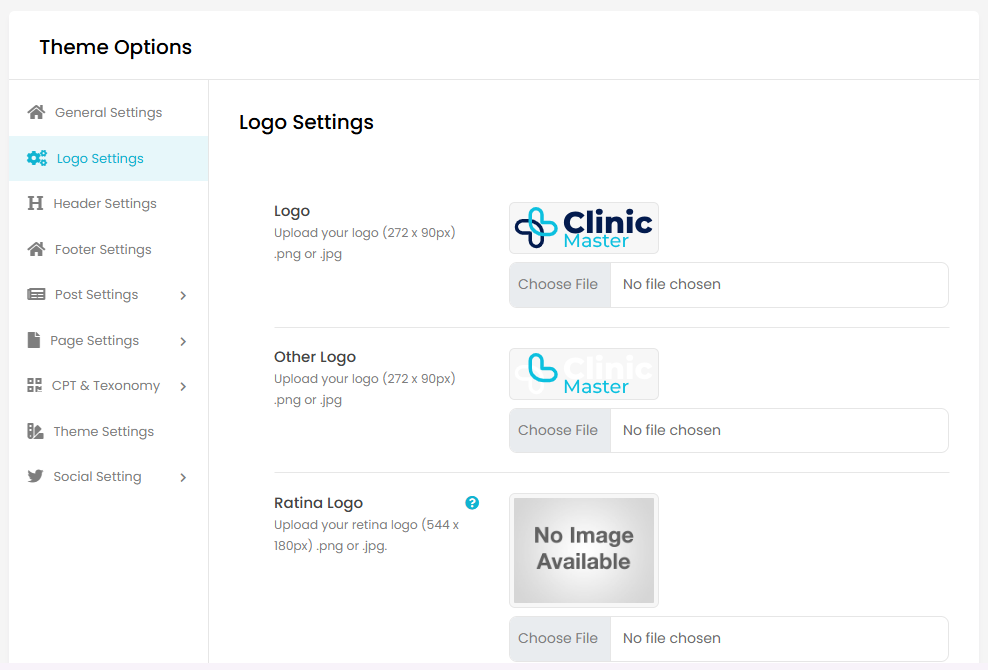
'Logo Setting' have options related to logo settings of theme like logo (for main logo of site), Other Logo (for other logo like white logo), Favicon (Favicon for frontend site), Logo Text (text for when logo type text), Email(Show in header top) and etc.
Header Setting -
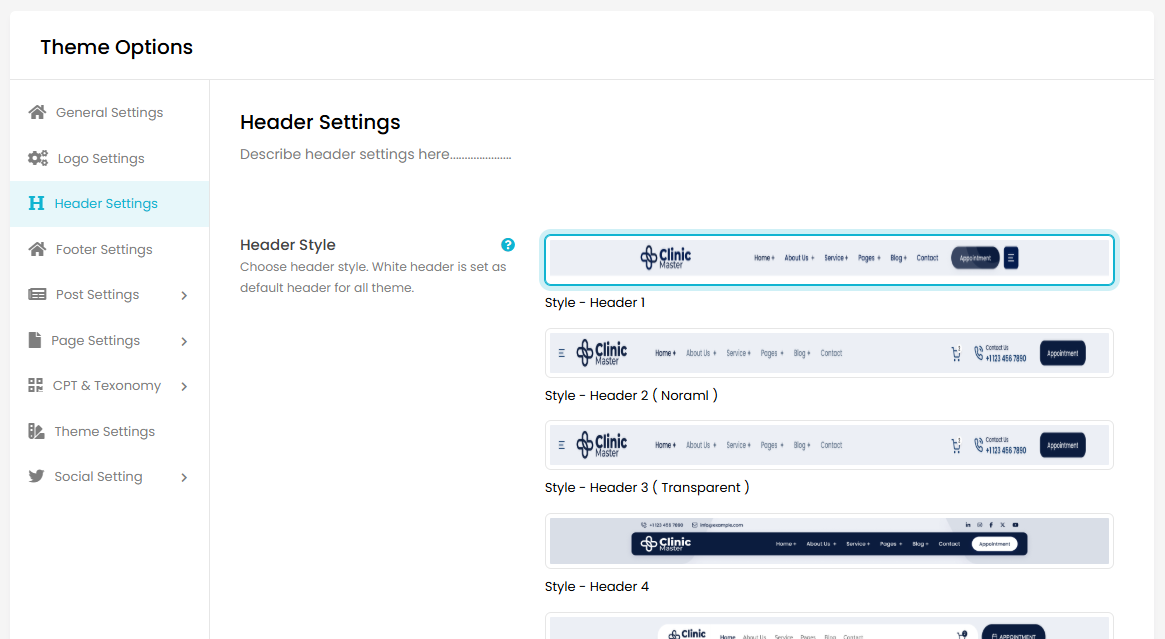
'Header Setting' have options related to Header settings of theme like Header Style (select a style of header for frontend), Top Bar (for enable or disable top bar), Choose icons for this Header (icons seen only ehen user fill url in Social Settings), Sticky Header (make header Sticky) and etc, for a particullar header style.
Footer Setting -
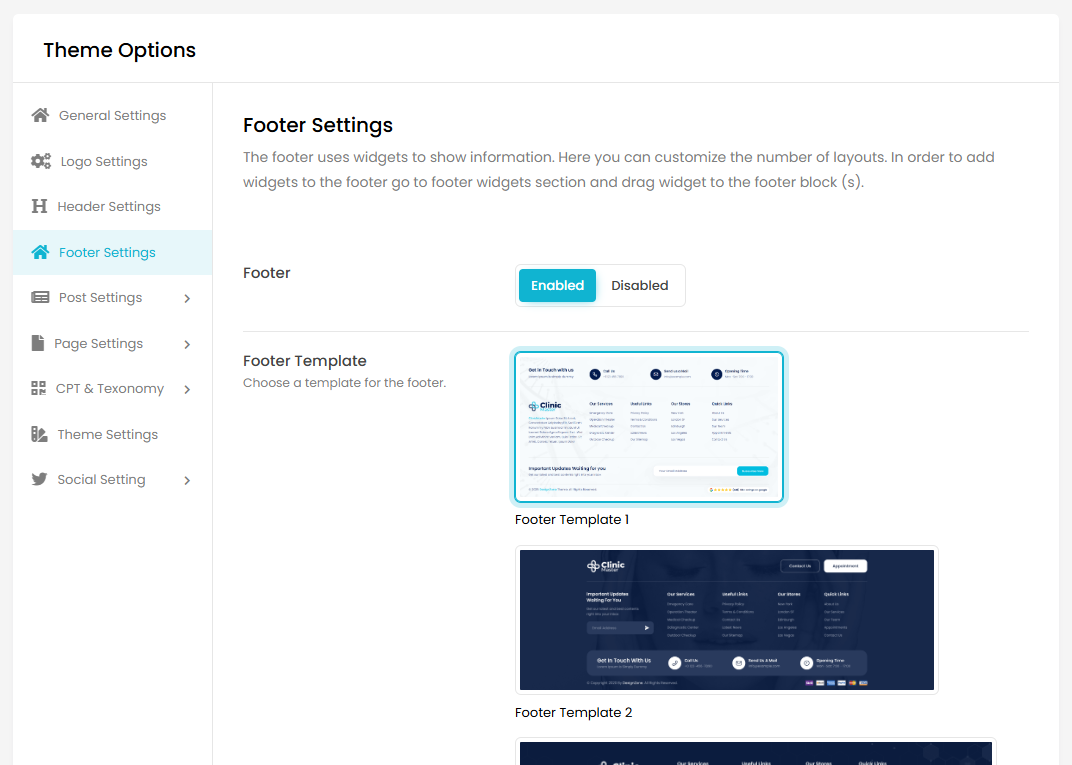
'Footer Setting' have options related to Footer settings of theme like Footer (for enable or disable footer), Footer Template (select style for footer), Copyright Text (Write footer copyright text) and etc.
Post Setting -
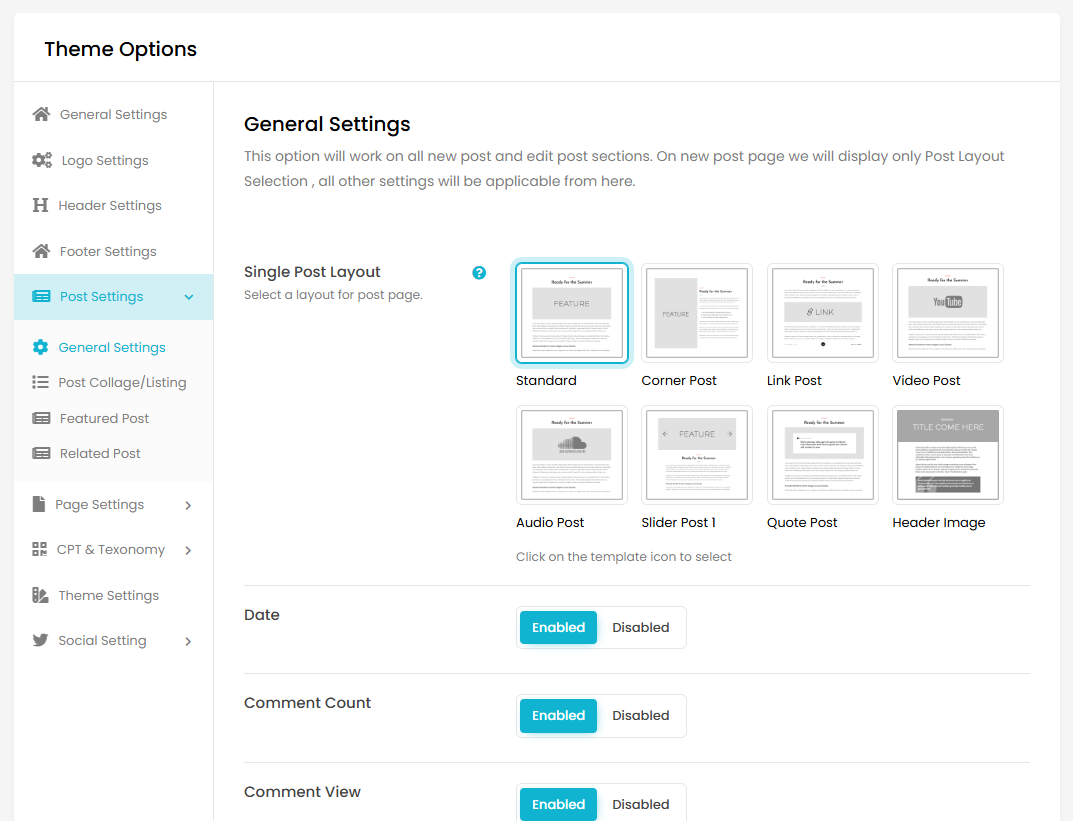
General Setting : The 'General Setting' have options related to post's genaral settings of theme like Single Post Layout (Select a layout for post detail page),Featured Image (enable or disable), Date (enable or disable), Comment Count (enable or disable), Author Box (enable or disable), Post Banner (enable or disable), Post Banner Image (Choose image for post banner) and etc.
Page Setting -
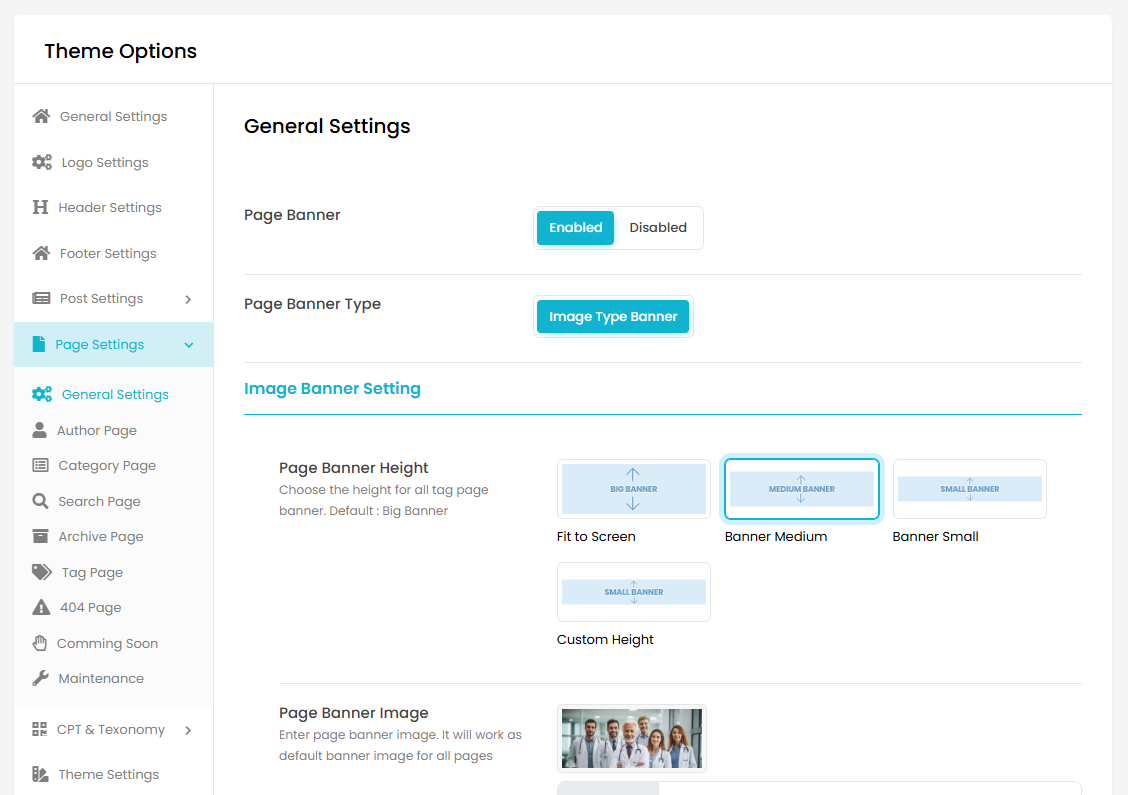
General Setting : The 'General Setting' have options related to Page's genaral settings of theme like Page Banner (enable or disable Page Banner), Page Banner Height (Choose the height for page banner), Page Banner Image (Choose banner image for the page) and etc.
Author Page : The 'Author Page' have options related to author's blogs listing page, it has similar page options like page general settings but separate if user want to change some setting for only author page
Category Page : The 'Category Page' have options related to Category's blogs listing page, it has similar page options like page general settings but separate if user want to change some setting for only Category page
Search Page : The 'Search Page' have options related to Search's blogs listing page, it has similar page options like page general settings but separate if user want to change some setting for only Search page
Archive Page : The 'Archive Page' have options related to Archive's blogs listing page, it has similar page options like page general settings but separate if user want to change some setting for only Archive page
Tag Page : The 'Tag Page' have options related to Tag's blogs listing page, it has similar page options like page general settings but separate if user want to change some setting for only Tag page
404 Page : The '404 Page' have options related to 404 Page settings of theme like Page Title (Title for 404 page), 404 Template ( choose style for 404 page), 404 Page Text (description for 404 page), 404 Page Button Text (Text for the Button in 404 page) and etc.
Social Setting -
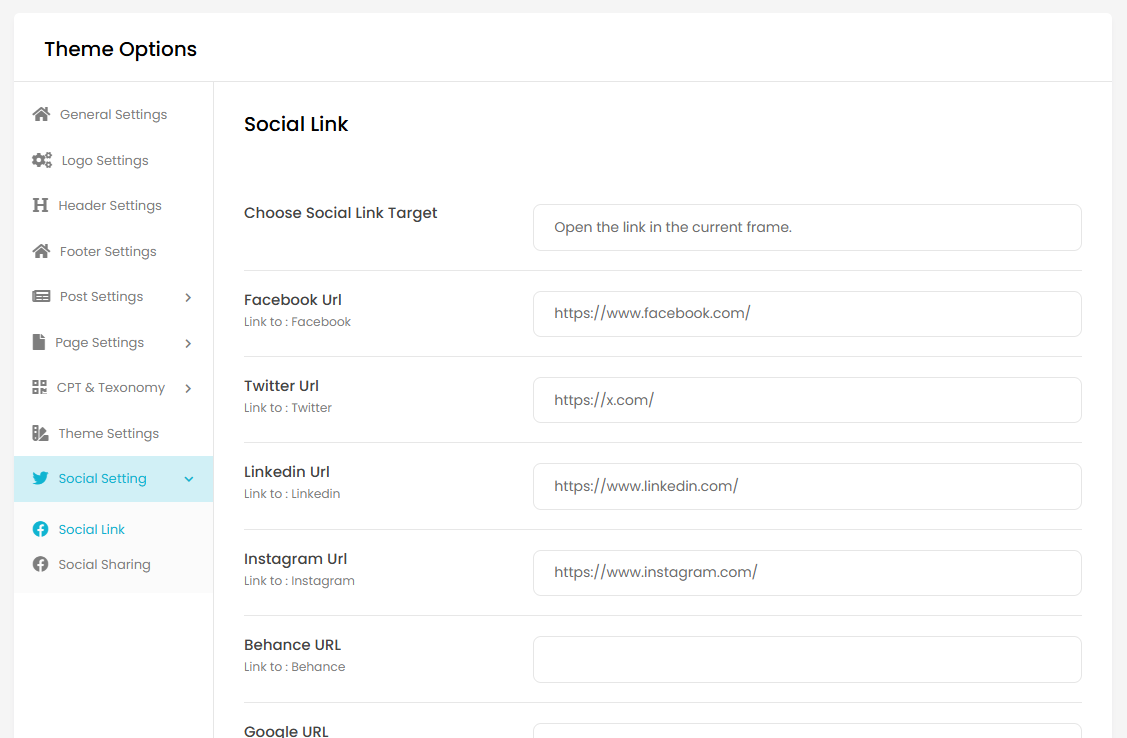
Social Link : The 'Social Link' have options related to theme's social icons and urls like theme like Choose Social Link Target and multiple social platforms url input box.
Social Sharing : The 'Social Sharing' have options related to theme's social icons and urls like theme like Enable Social Shaing On Post and Page for enable or desable sharing button .
Widgets and Sidebars -
Widgets
Now we have added a newly created Widgets system. This makes theme more Customizable to crate sidebars and footers dynamic for a particular page or blog. User can change almost everything in a widget. W3cms has some default widgets like Search, Recent Posts, Categories, Tags etc.
its very easy to create and use, just go to the 'Widgets' in admin under the 'Appearence' Menu, there is a 'Add Widget' Button.
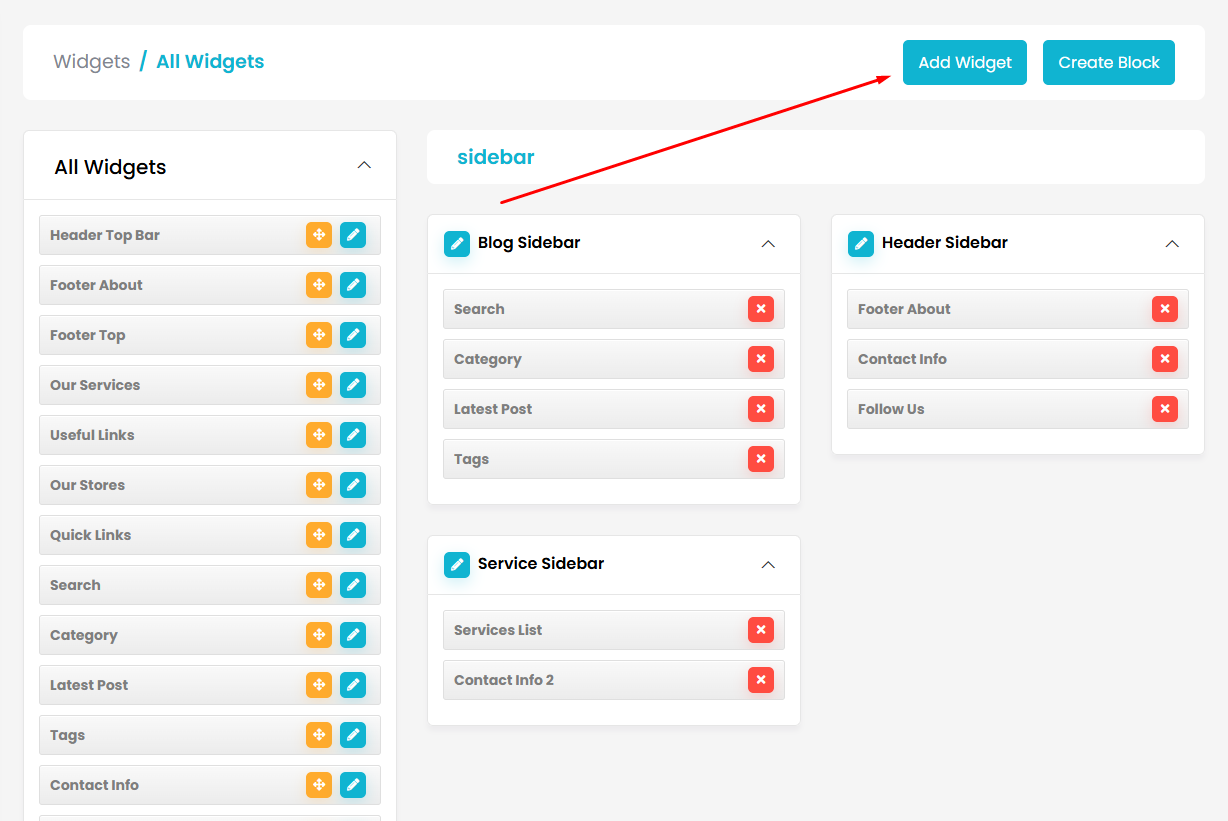
after click on that button you will see a create widget page. so fill the title field and choose a Widget Element by magic editor and fill the necessary info in widget and save it, and the widget will be show in 'all widgets' section in widgets index.
Note : If you want to add widget in footer then newly created widget directly show in footer settings in theme options.
Sidebars
In w3cms we call sidebar as block. for creating a sidebar we have to create a block by clicking 'Create Block' Button and a popup will be display. there is different types for block if you want to create a sidebar, select type sidebar. and after submit, sidebar will be display in sidebar Section in Widgets Index. Like i created a Test SideBar.
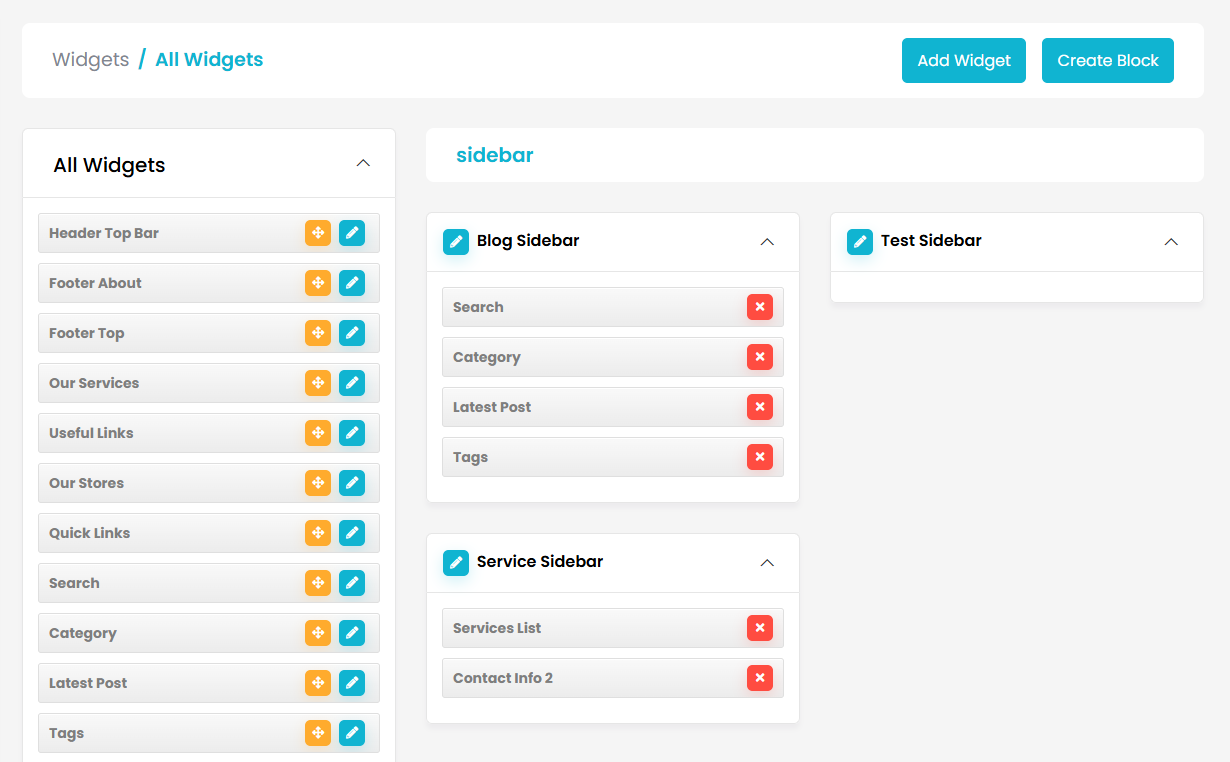
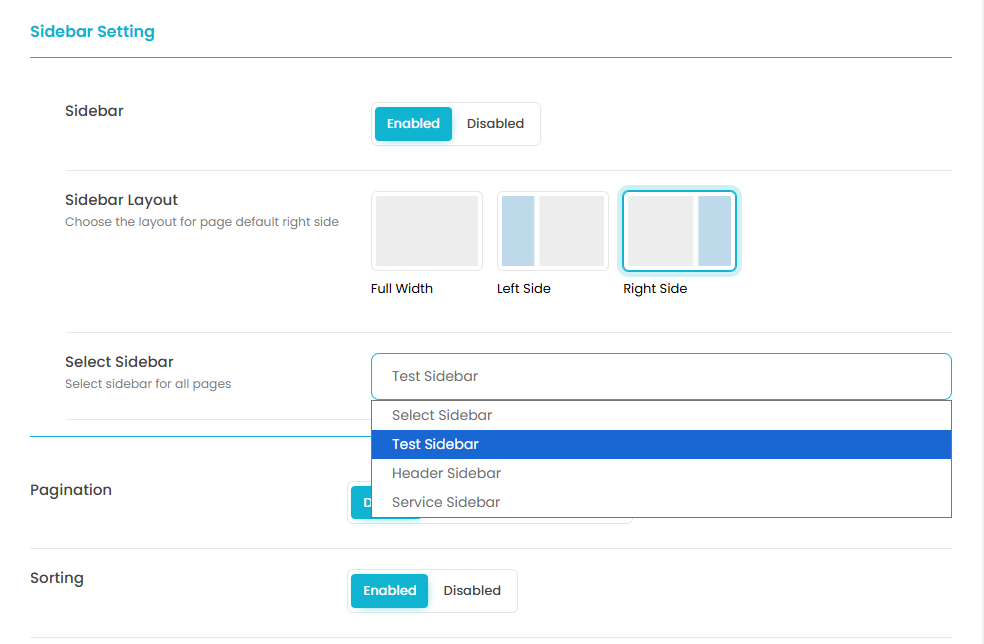
Now add Widgets without submitting By simply Drag and drop from 'All Widgets' to your sidebar and to display sidebar in Page or Post just go to Theme Options in Page and Post Settings there is option to select sidebar or you can also select sidebar from Edit Blog Like Below
Page Editor -
Page Editor
Now we have added a newly created Customizable Page Editor system created by our team.It makes simpler for users to create and edit pages. This is very simple to use and Customizable.
So How it Work ?
It Makes easy to create and edit a Page. when we create a page we add elements(sections) as our need, so w3cms page editor has functionality for add, edit and delete elements(sections) easily. w3cms have both some global and themes elements. in Next Steps we will see how it works.
Before this page editor we used to add only static html while creating a new page but after adding this page editor, html is already added in elements(in the views file of theme) and user just add content for html in element by page editor. so it makes pages dynamic.
Add Edit and Delete a Element -
We can easily add an element, by clicking on 'Add element' button or '+' button, by clicking it we see a Model of elements. as per image below:
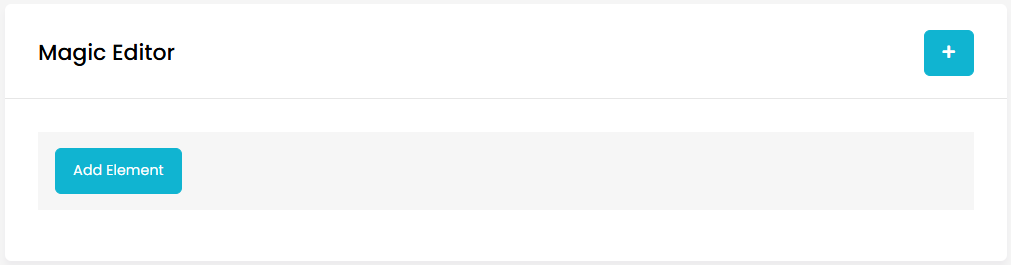
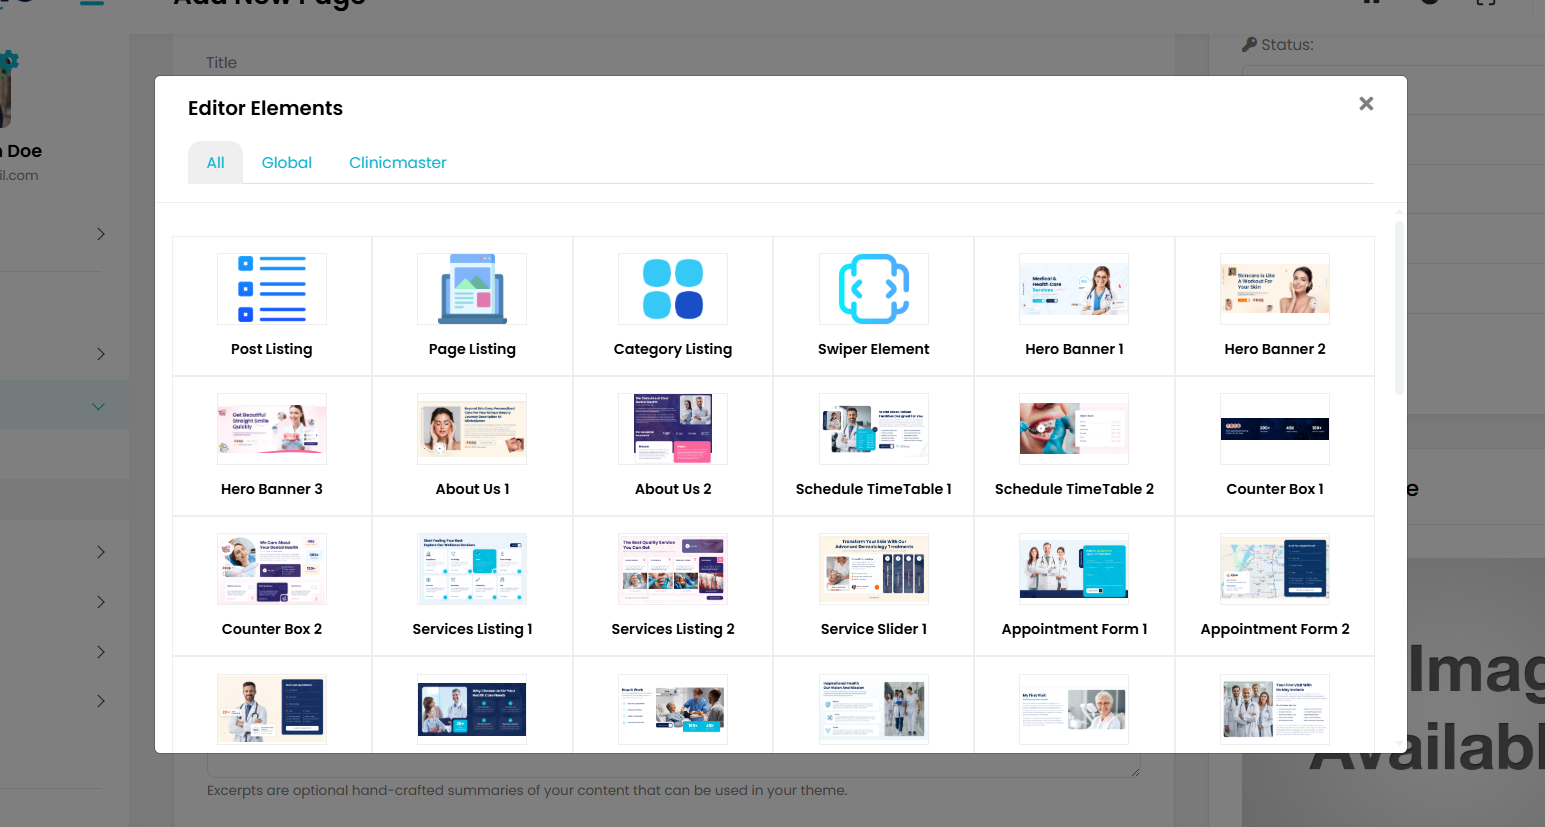
select an element, and it will be added in magic editor content box.
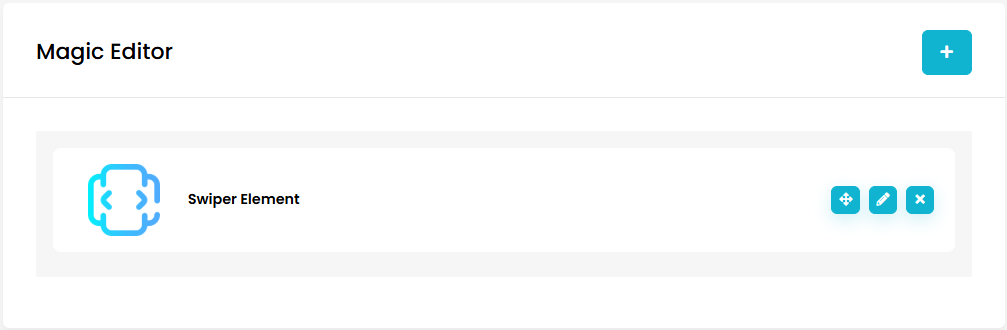
Next, after clicking on edit button we will see a model of input form , Then insert the Suitable content for the element and it will show on the site with the theme HTML.
We can easily Delete an Element by clicking on 'x' button.
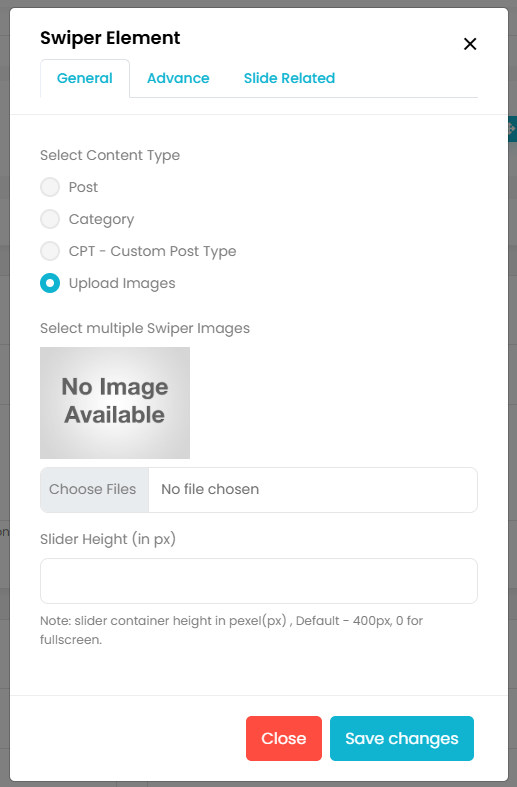
Examples of some element's Fields -
There are several common fields what you will see in elements.
Title :The 'Title' field Will add a section Title in the section.
Subtitle :The 'Subtitle' field Will add a section Subtitle in the section.
Description :The 'Description' field Will add a section Description in the section.
Select Categories :The 'select categories' field choose categories of posts you want to show on post listing section. if you choose nothing then all posts will be shown in section.
Post With Images Only :The 'Post With Images Only' field is a checkbox if this is checked then only post which have featured image will show in section .
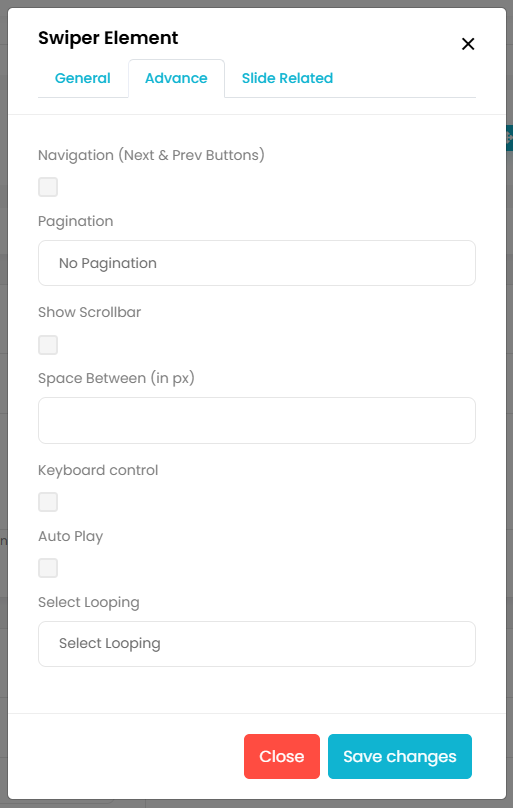
Pagination :The 'Pagination' field is a checkbox if this is checked then pagination button will show in section .
No. of Posts Per Page :The 'No. of Posts Per Page' field is for how many posts will show in section.
Order and Order By :The 'Order and Order By' fields is for what is the order of posts in list and if select nothing then order is random.
View all or Read more :The 'View all or Read more' these fields are checkbox , when this is checked then a second field 'Select Page' is shown for redirect on a page, these checkbox will show a button in section for page redirect on other page.
Add More Button :The 'Add More Button' is ajax based button. This will be add a few content or box (box of input fields) of html by ajax , it will be used for add more features, add more Slides in slider, Add more Social icons etc.
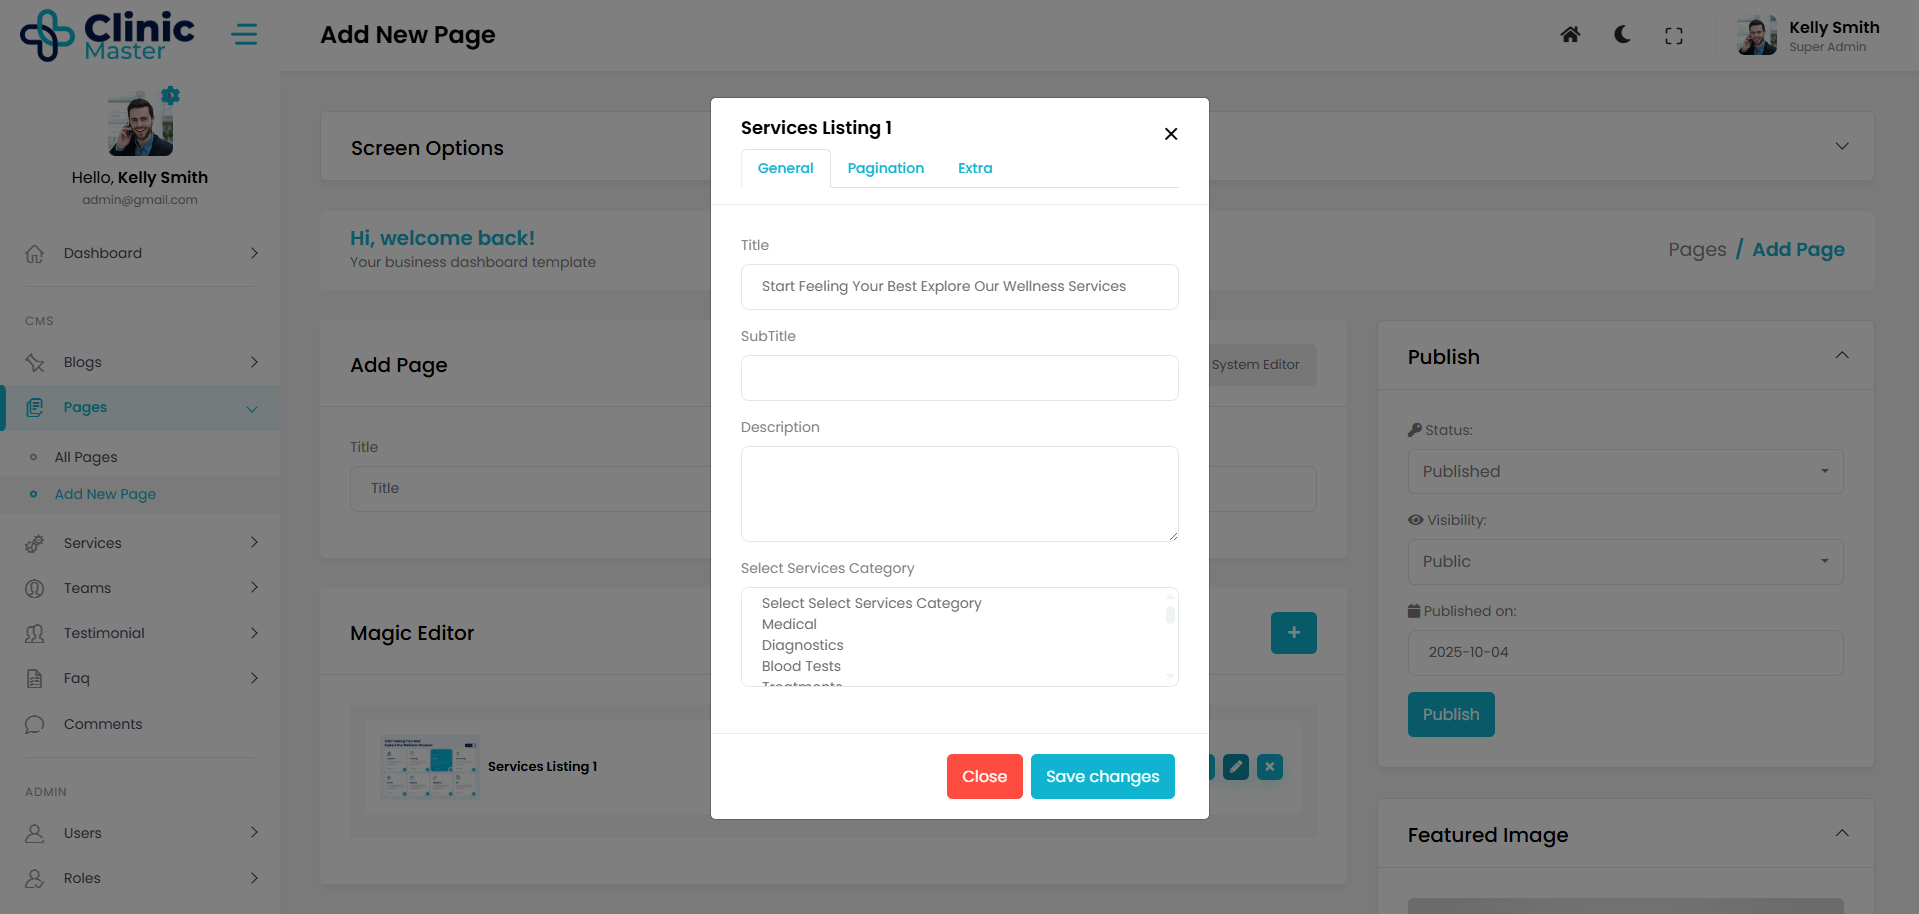
CPT - Custom Post Type Dropdowns :There is some dropdown fields for CPT - Custom Post Types. this works when select a Custom Post Type then a dropdown of post type categories will show. these are ajax based dropdowns and show data dynamically by database. Example - Services, Testimonials etc.
W3CPT - Custom Post Type -
What Is Custom Post Type
It's possible to generate your own post types, referred to as custom post types, which prove valuable when crafting content that deviates from the standard post or page format. You could also create custom post types for portfolios, testimonials, products, teams and services.
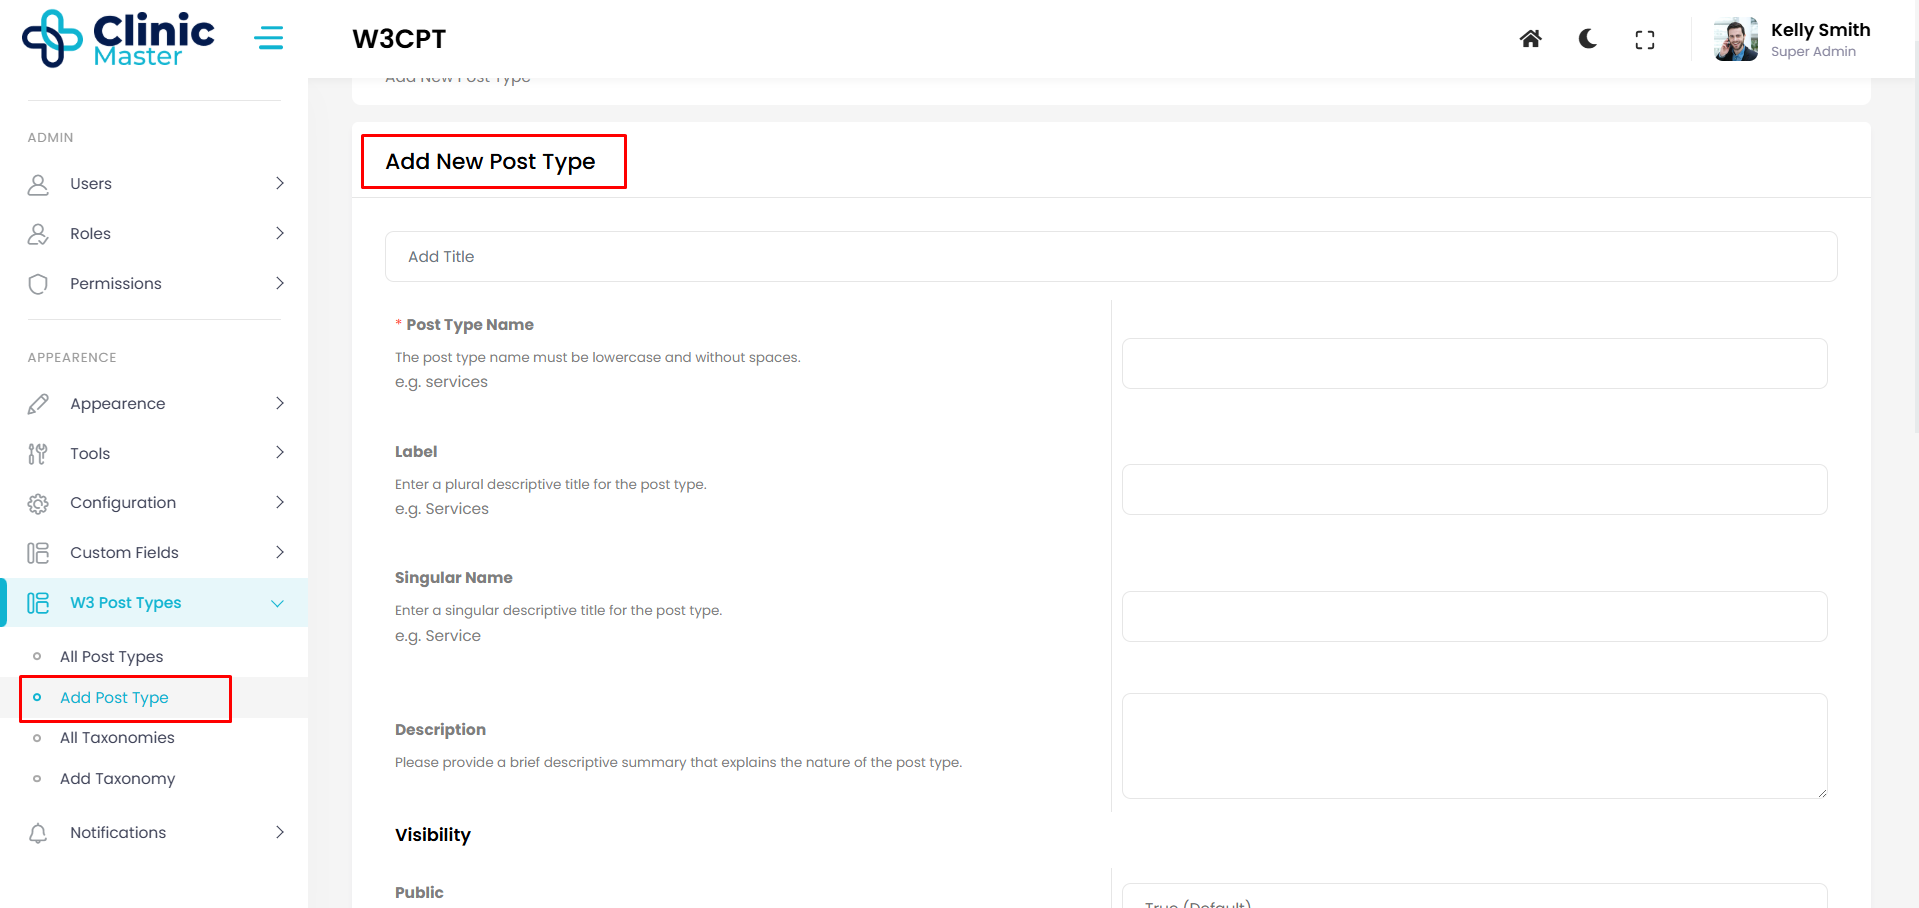
Creating a Custom Post Type
This method create custom post type with safe and easy way. You can create and update custom post type go to W3 Post Types -> Add Post Type
How To Show Custom Post Type On Front?
To show custom post type on you site go to Appearence -> Menus and add like showing below screenshot.
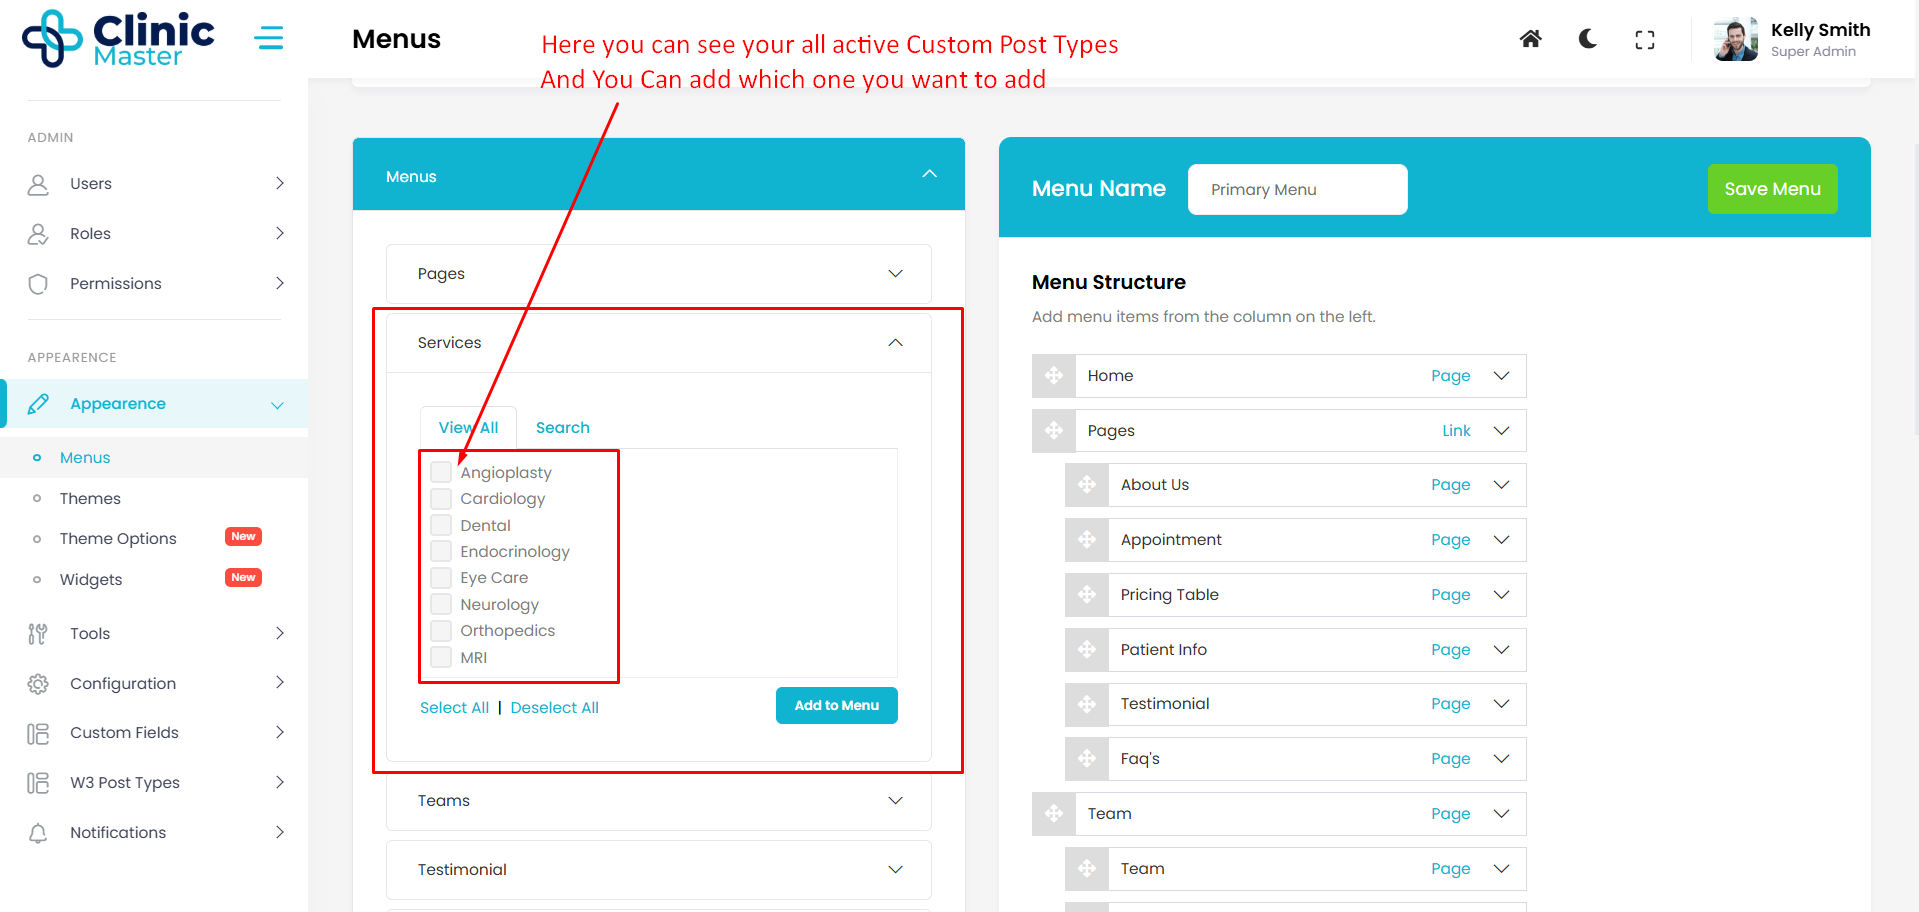
There is more way to display custom post type using magic editor
Notifications -
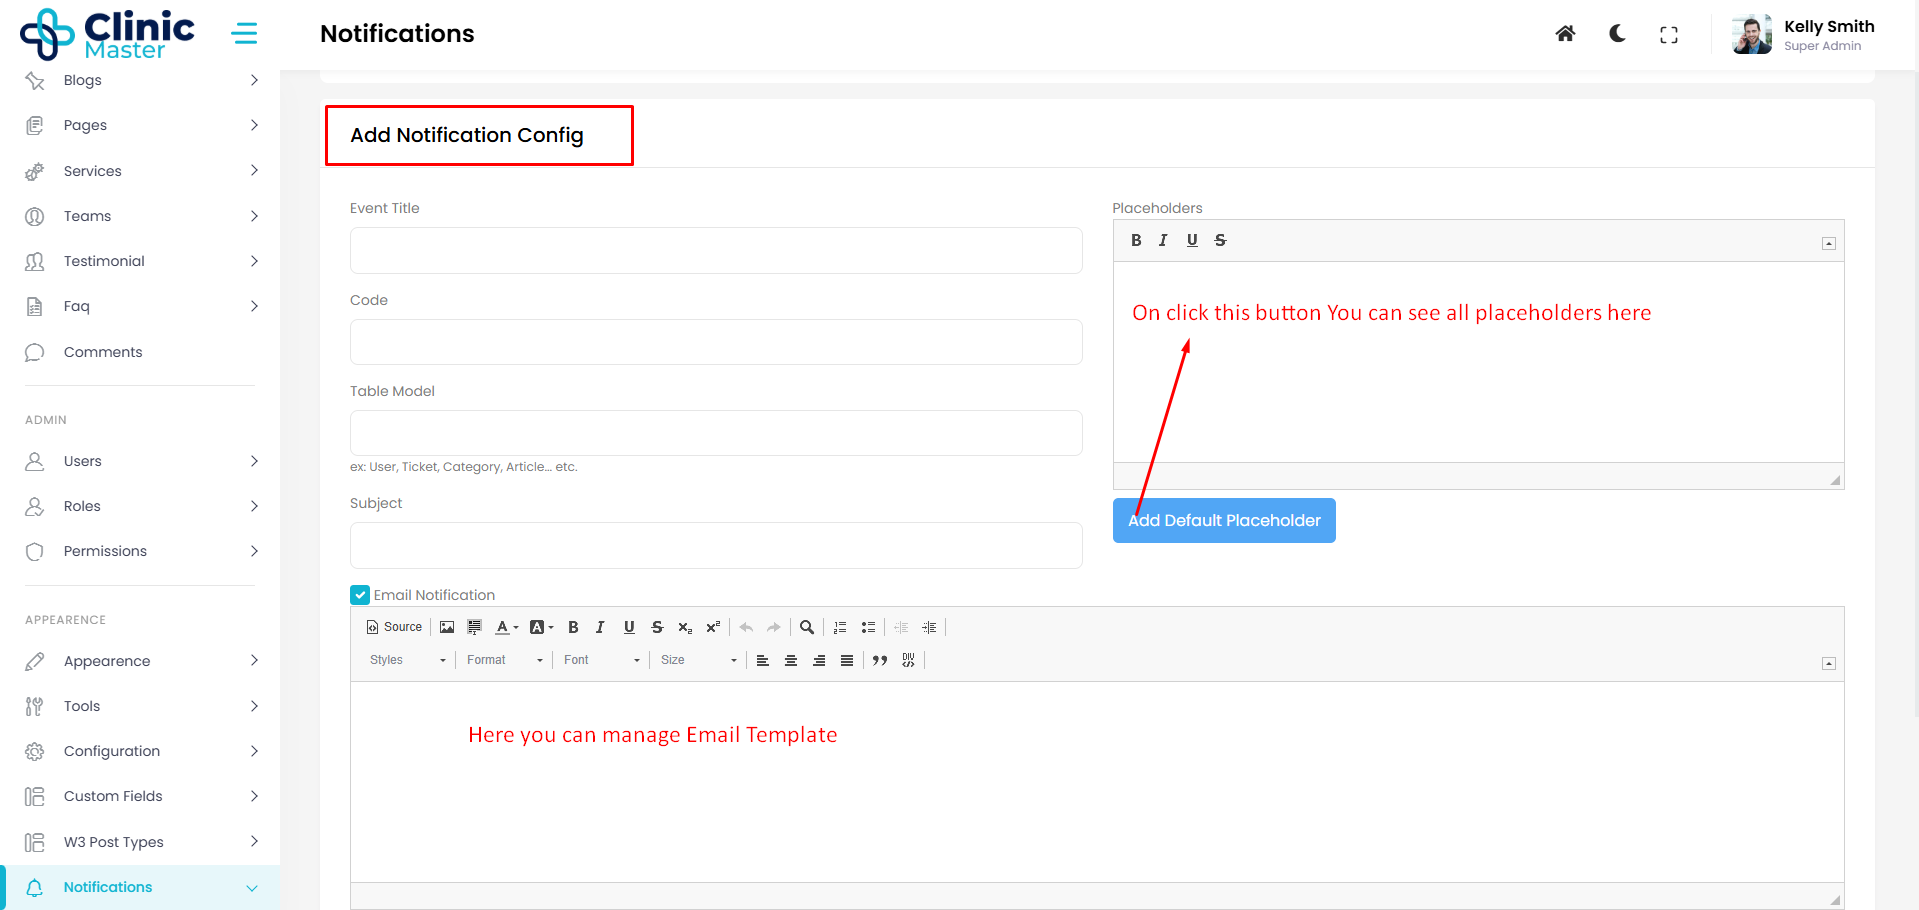
What Is Usage Of Notifications?
Using notification system you can create and update notification templates go to Notifications -> Add Notification Config
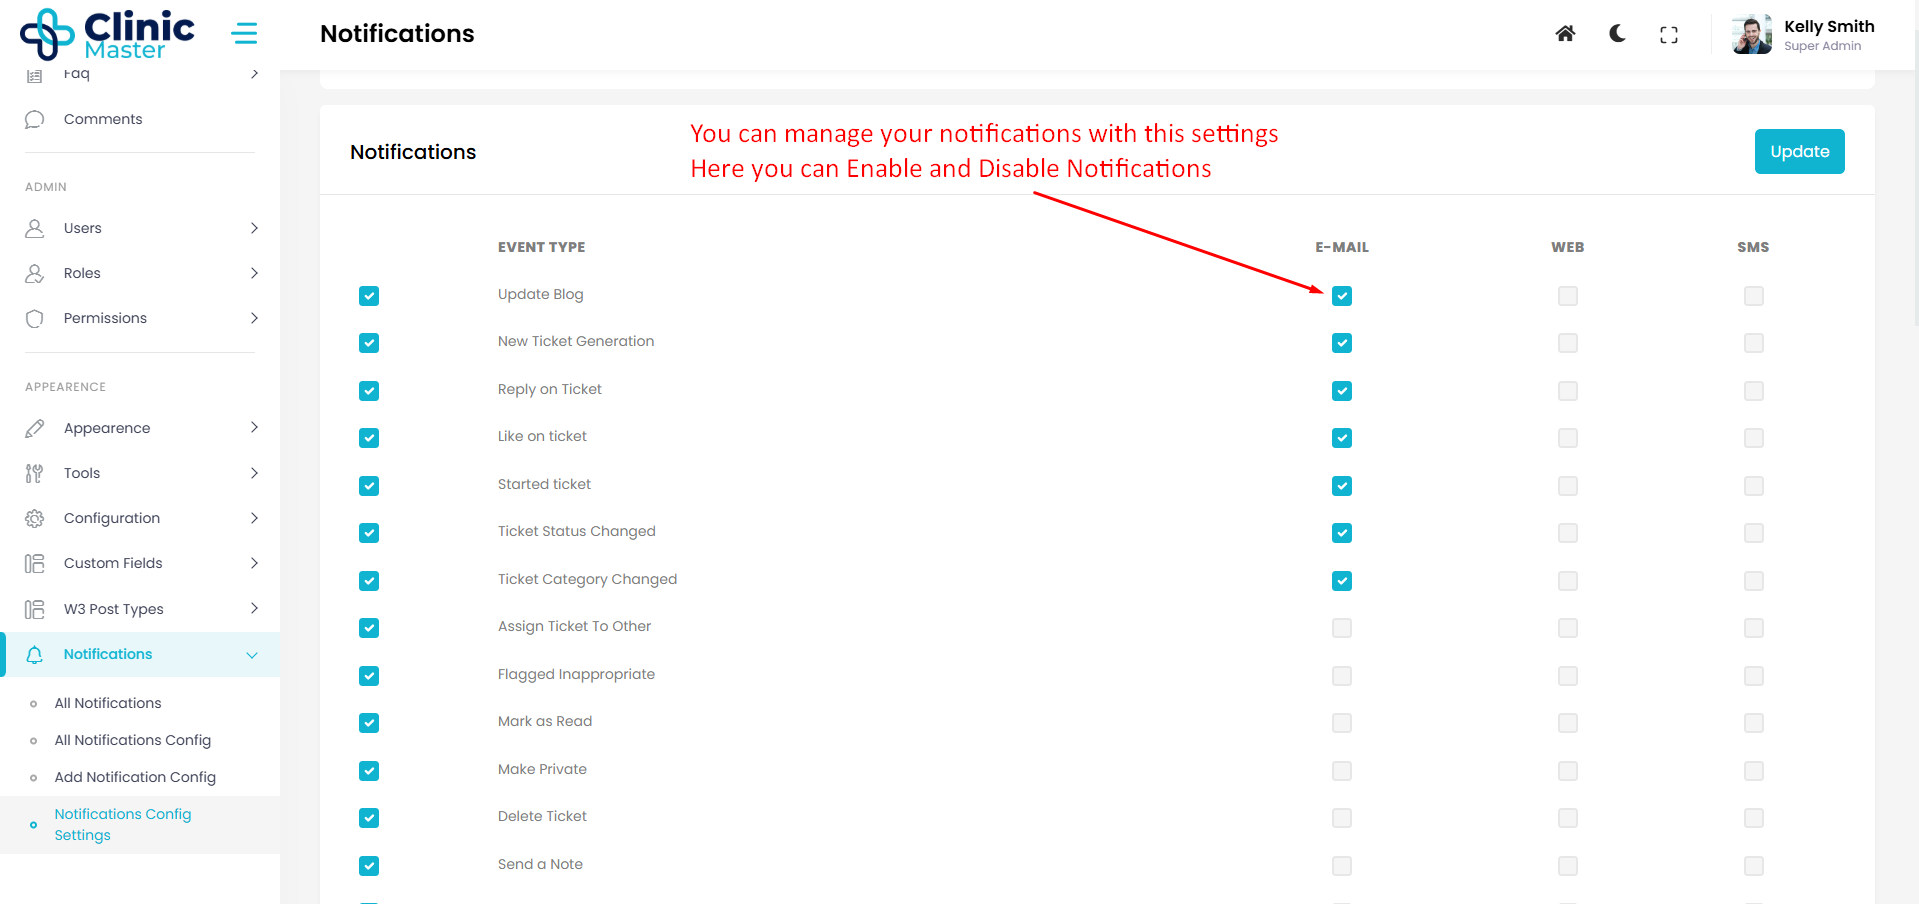
Enable and Disable Notification
See below screenshot, you can mangage notification settings go to Notifications -> Notification Config Settings
Use following method to send notification in controller:-
<?php
namespace App\Http\Controllers\Admin;
use App\Http\Controllers\Controller;
use App\Models\Notification;
class MyController extends Controller
{
    public function funcation_name()
    {
    	// Your functionality code

    	$notificationObj        = new Notification();
        $notificationObj->notification_entry('Event Code', 'Object Id', 'Sender Id', 'Receiver Id');

    }
}
Import & Export -
How to use Import & Export ?
w3cms has features for import and export data. you can use these features for backup or transfor data in another w3cms instsllstion but before using these features firstly take a backup of your database for safety.
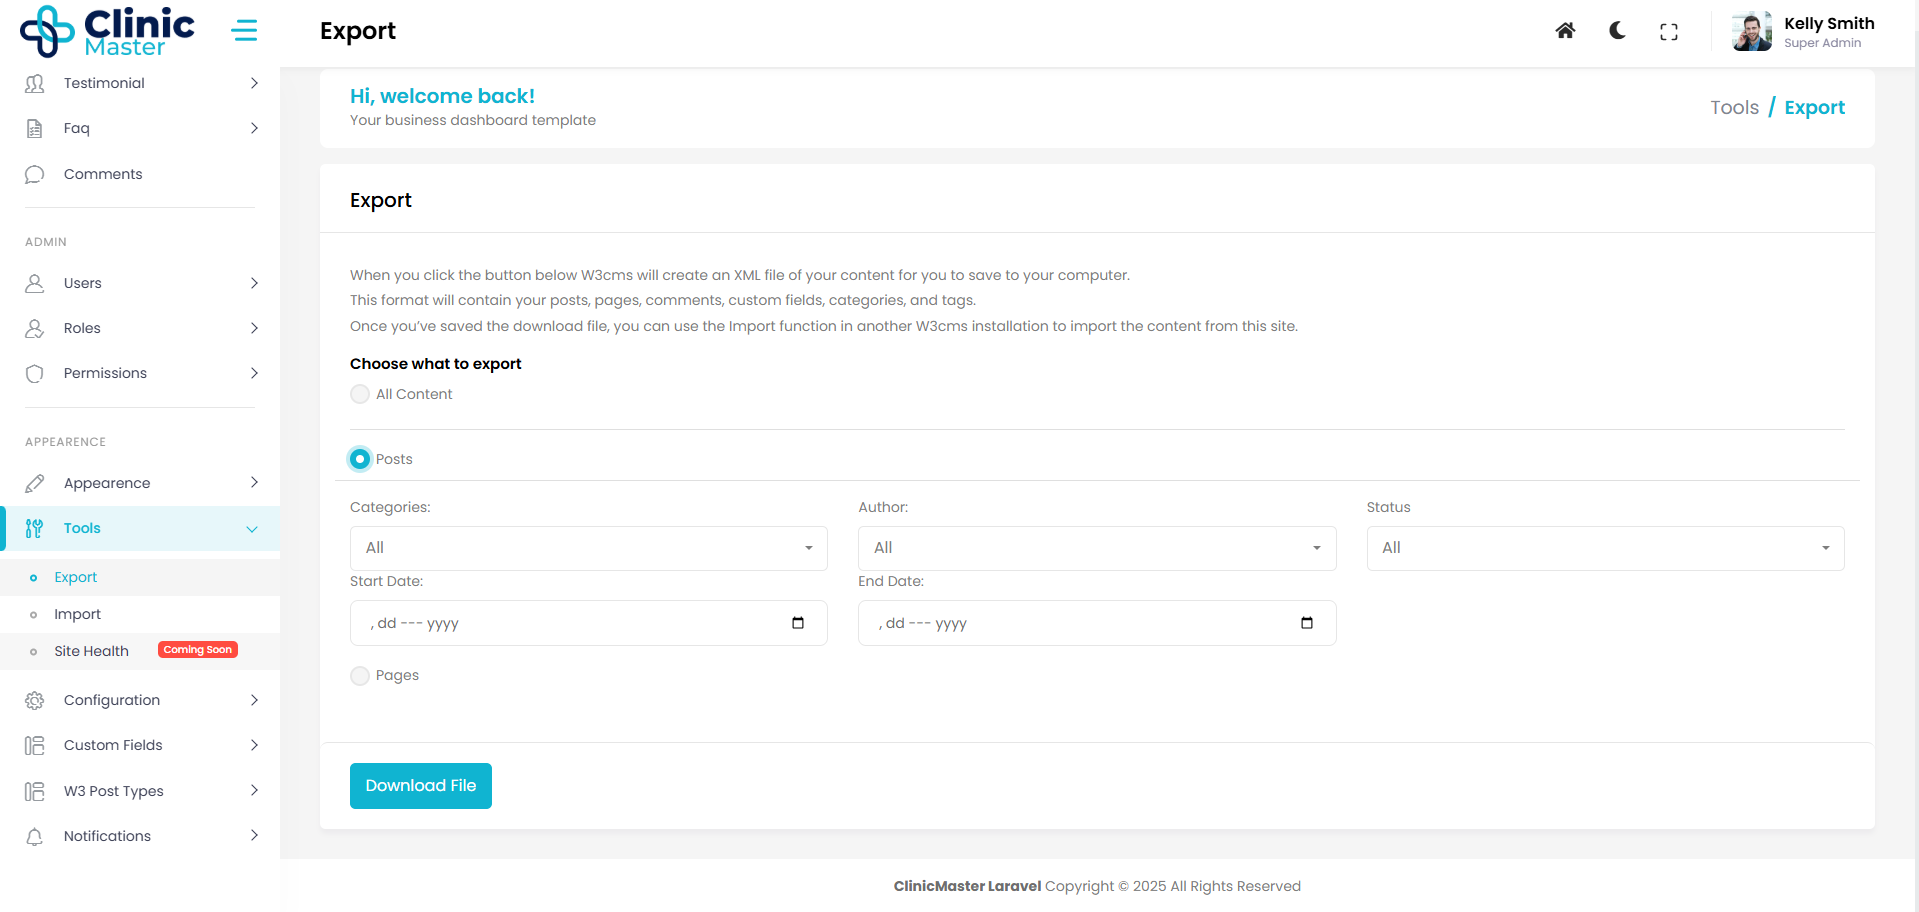
Export -
w3cms has features for Export data. w3cms export data of blogs, pages, categories, tags and menus from database in a xml file.
users have options for export filtered data or export all contents (blogs, pages, categories, tags and menus).
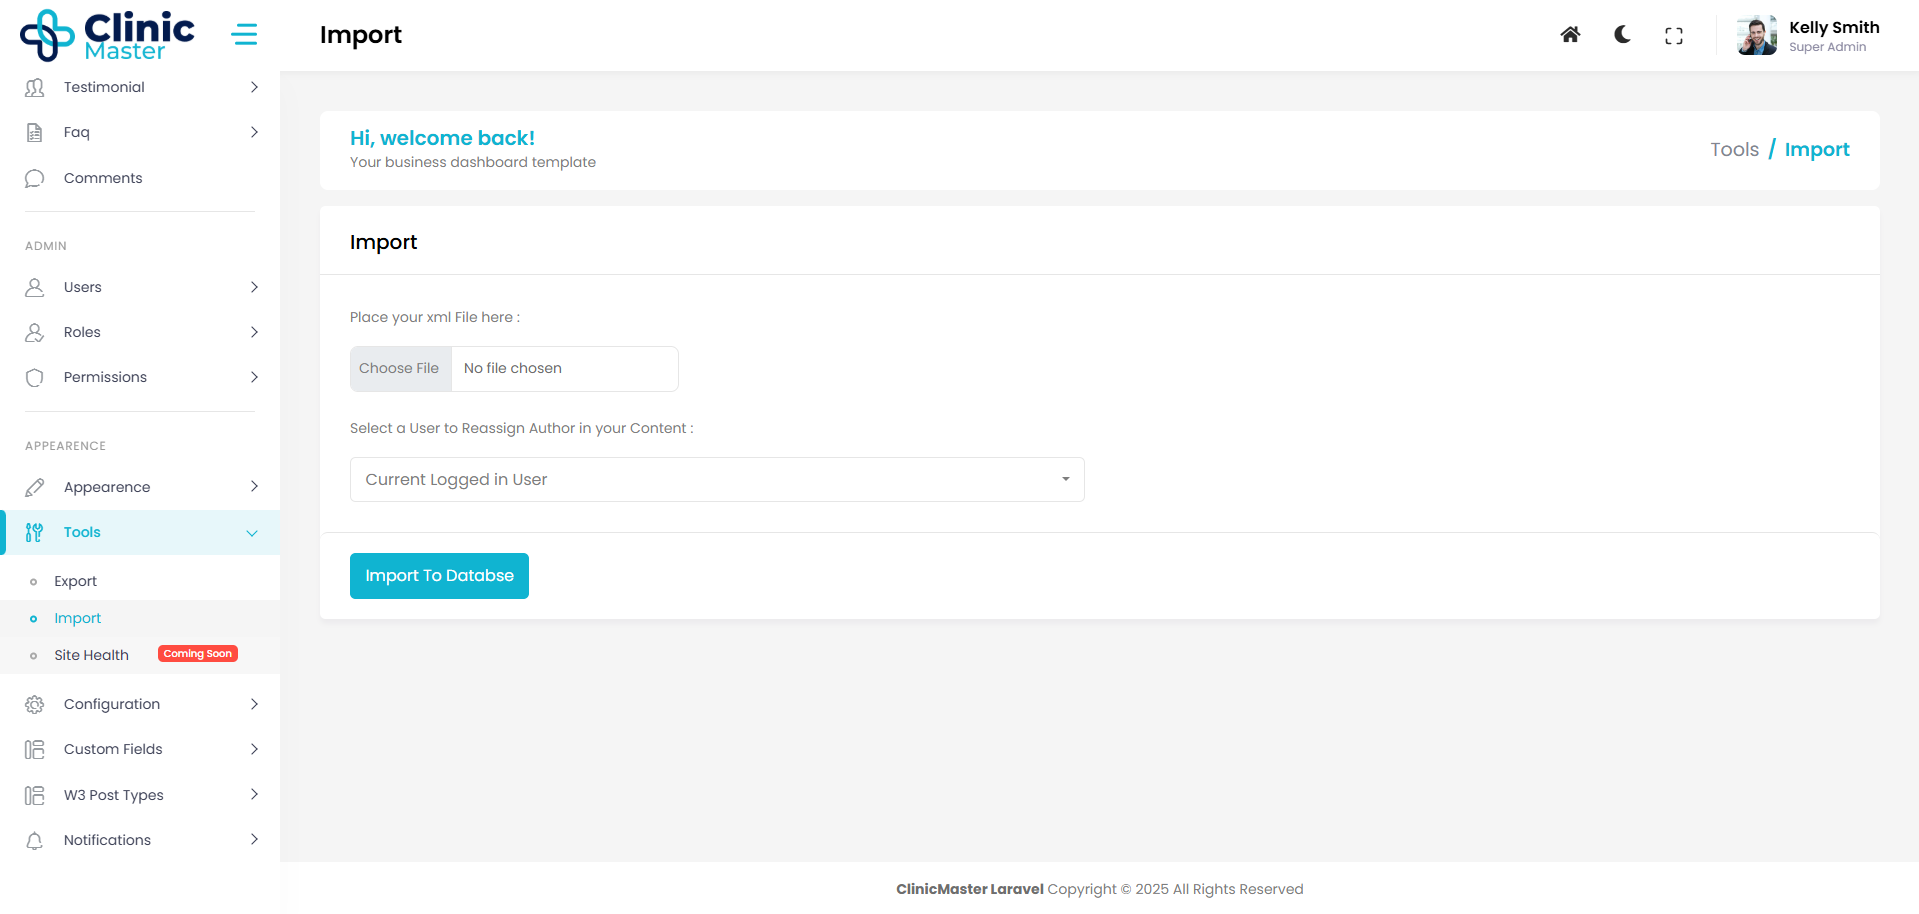
Import -
w3cms has features for Import data. import Feature import data from xml file to database for the content available in xml file.
w3cms import only support specific xml file exported by w3cms.
Theme Manager -
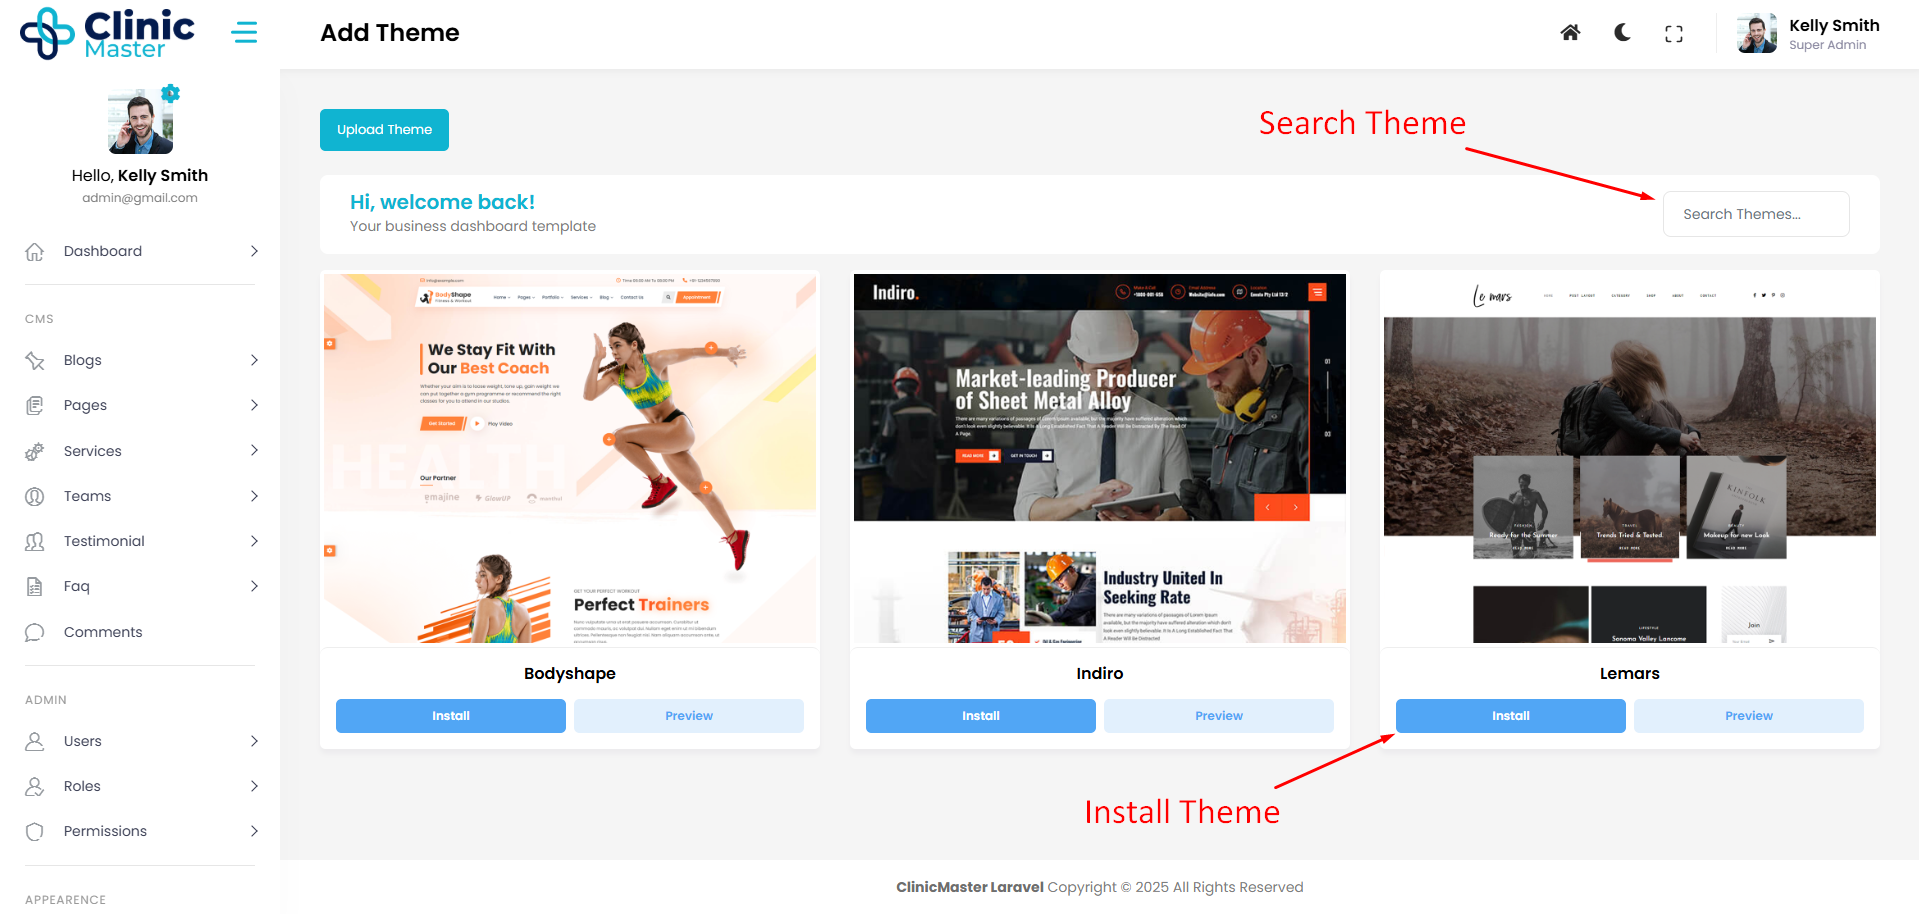
How to Manage Themes ?
ClinicMaster CMS uses Laravel Theme Manager (Hexadog) For Management of themes. Themes Managed like wordpress, directly download from Live Server, with separate assets, elements, options and demo import file.
there is also One Click Demo Import Available.
1. Activate Theme
ClinicMaster has options for change themes easily for frontend sites. just click on active button for activate a theme.
Note: Check Theme Demo Import, to see how theme Import Works.
Create Theme -
You can easily create a new Theme by using the following command and follow the steps:
	php artisan theme:make

 	  Theme Name:
 	  >

 	  Vendor name:
 	  >

 	  Author name:
 	  >

 	  Description:
 	  >

 	  Version:
 	  >

 	  Is it a child theme? (yes/no) [no]:
 	  > y

 	  Parent theme name:
 	  >
This command will create a new Theme directory with all necessary files (Like public and resources folders) within the themes folder.
Folder Structures -
Note: All the different themes can have different structures because of thier design.
This is The Folder Structure of Newly Created Theme Folder-
- themes
- vendorName
- themeName
- public
- css
- js
- img
- resources
- views
- layouts
- app.blade.php
- guest.blade.php
- layouts
- views
- composer.json
- public
- themeName
- vendorName
This is The Folder Structure of ClinicMaster themes Folder-
- bodyshape
- includes
- MagicEditor
- ElementsClass.php
- W3Options
- BlogOptionsClass.php
- PageOptionsClass.php
- theme-options-data.php
- MagicEditor
- public
- css
- fonts
- icons
- images
- js
- scss
- vendor
- resources
- views
- elements
- ajax
- ajax_archive_blog_listing.blade.php
- ajax_author_blog_listing.blade.php
- ajax_blog_listing.blade.php
- ajax_category_blog_listing.blade.php
- ajax_index_blog_listing.blade.php
- ajax_search_blog_listing.blade.php
- ajax_search_page_listing.blade.php
- ajax_tags_blog_listing.blade.php
- comingsoon
- comingsoon_1.blade.php
- footer
- footer_template_1.blade.php
- footer_template_2.blade.php
- header
- header_1.blade.php
- header_2.blade.php
- header_3.blade.php
- maintinance
- maintenance_1.blade.php
- page_listing
- page_listing_1.blade.php
- post_listing
- post_listing_1.blade.php
- post_listing_2.blade.php
- post_template
- post_audio.blade.php
- post_cornerimage.blade.php
- post_header_image.blade.php
- post_link.blade.php
- post_quote.blade.php
- post_slider_1.blade.php
- post_slider_2.blade.php
- post_standard.blade.php
- post_video.blade.php
- author_block_element.blade.php
- banner-inner.blade.php
- blog_pagination_element.blade.php
- child_comments.blade.php
- comments_block.blade.php
- footer_top_bar_1.blade.php
- header_top_bar_1.blade.php
- index_ajax_post_listing.blade.php
- main-banner.blade.php
- meta.blade.php
- nav_menu.blade.php
- pagination.blade.php
- password_protected_block.blade.php
- related_blog_element.blade.php
- sidebar.blade.php
- ajax
- email_templates
- contact_us.blade.php
- errors
- 404.blade.php
- 503.blade.php
- coming_soon.blade.php
- layout
- default.blade.php
- fullwidth.blade.php
- w3elements
- pages
- blog_listing.blade.php
- blog_listing_2.blade.php
- contact_us_form_1.blade.php
- content_box_1.blade.php
- content_box_2.blade.php
- content_box_3.blade.php
- counter_1.blade.php
- map_1.blade.php
- portfolio_slider_1.blade.php
- post_slider_1.blade.php
- services_listing_1.blade.php
- services_listing_2.blade.php
- subscription_box_1.blade.php
- testimonial_slider_1.blade.php
- widgets
- archives.blade.php
- categories.blade.php
- recent_posts.blade.php
- recent_posts_footer.blade.php
- search.blade.php
- tags.blade.php
- widget_about.blade.php
- widget_locations.blade.php
- widget_working.blade.php
- pages
- archive.blade.php
- author.blade.php
- category.blade.php
- contact.blade.php
- index.blade.php
- page.blade.php
- search.blade.php
- single.blade.php
- tag.blade.php
- elements
- views
- composer.json
- cryptozone.xml
- screenshot.png
- includes
Adding Assets and Views of theme -
Different themes can have different File and Folders because of thier Different design. but some files like main views will be same for every theme. if user want to create a theme this will be very easy because user can create files like elements as usable in themes
When the theme is active, theme manager will create symbolic link from new theme's public folder to root public folder. so that user can use active theme assets easily.
Assets -
You can add any theme Asset like css, js, icons and images in public folder of newly created theme under the themes folder. For Ex.- themes/vendor/{{new_theme}}/public.
Views -
Themes Manager allows you to override error views by creating Theme's specific error views into themes/vendor/{{new_theme}}/resources/views/errors directory of your theme. so you can make different errors and coming soon pages for different themes.
if you want to add views in theme you can see the folder structure of w3cms in previous steps, to add views. w3cms has use some helper functions in views (created by w3cms) for getting menus, links of blogs and other things.
see some of these options before creating views :
menus - w3cms has in built function DzHelper::nav_menu() for creating recursive menus under package/app/Helper/DzHelper.php file. this helper function calls nav_menu.blade.php under {{new_theme}}/resources/views/elements/nav_menu.blade.php folder. menus created in admin panel and set on a location like 'primary' and these locations were set in your views to call a menu. all menu locations available in package/config/menu.php file.
	{{ DzHelper::nav_menu(
	  	array(
	 		'theme_location'  => 'primary',
	 		'menu_class'      => 'nav navbar-nav navbar',
	  	)
	  ); }}
links - w3cms has some helper functions for calling links of a detail page, blog, category tags etc. all links functions available in package/app/Helper/DzHelper.php file.
href="{{ DzHelper::laraBlogLink($blog->id) }}"
Page Elements -
Creating a Page of multiple Sections is very easy in w3cms beacuse of magic editor. different themes have different sections(Elements).
Theme Demo Import (Optional) -
Importing demo data is optional, and you can decide whether to include it based on your preference for starting with pre-built content or setting up your site manually.
In W3CMS, we offer three methods to import demo content, allowing you to choose the setup process that best suits your needs. Below, we describe how each option works, so you can select the one that best fits your requirements:
Note: it’s highly recommended to take a full backup of your website, ensuring that you can easily restore your site if anything goes wrong during the process.
1.- Log in to Your Admin Dashboard
- Open your web browser and navigate to your W3cms admin login page (usually yourdomain.com/admin).
- Enter your username and password to log in to the W3cms dashboard.
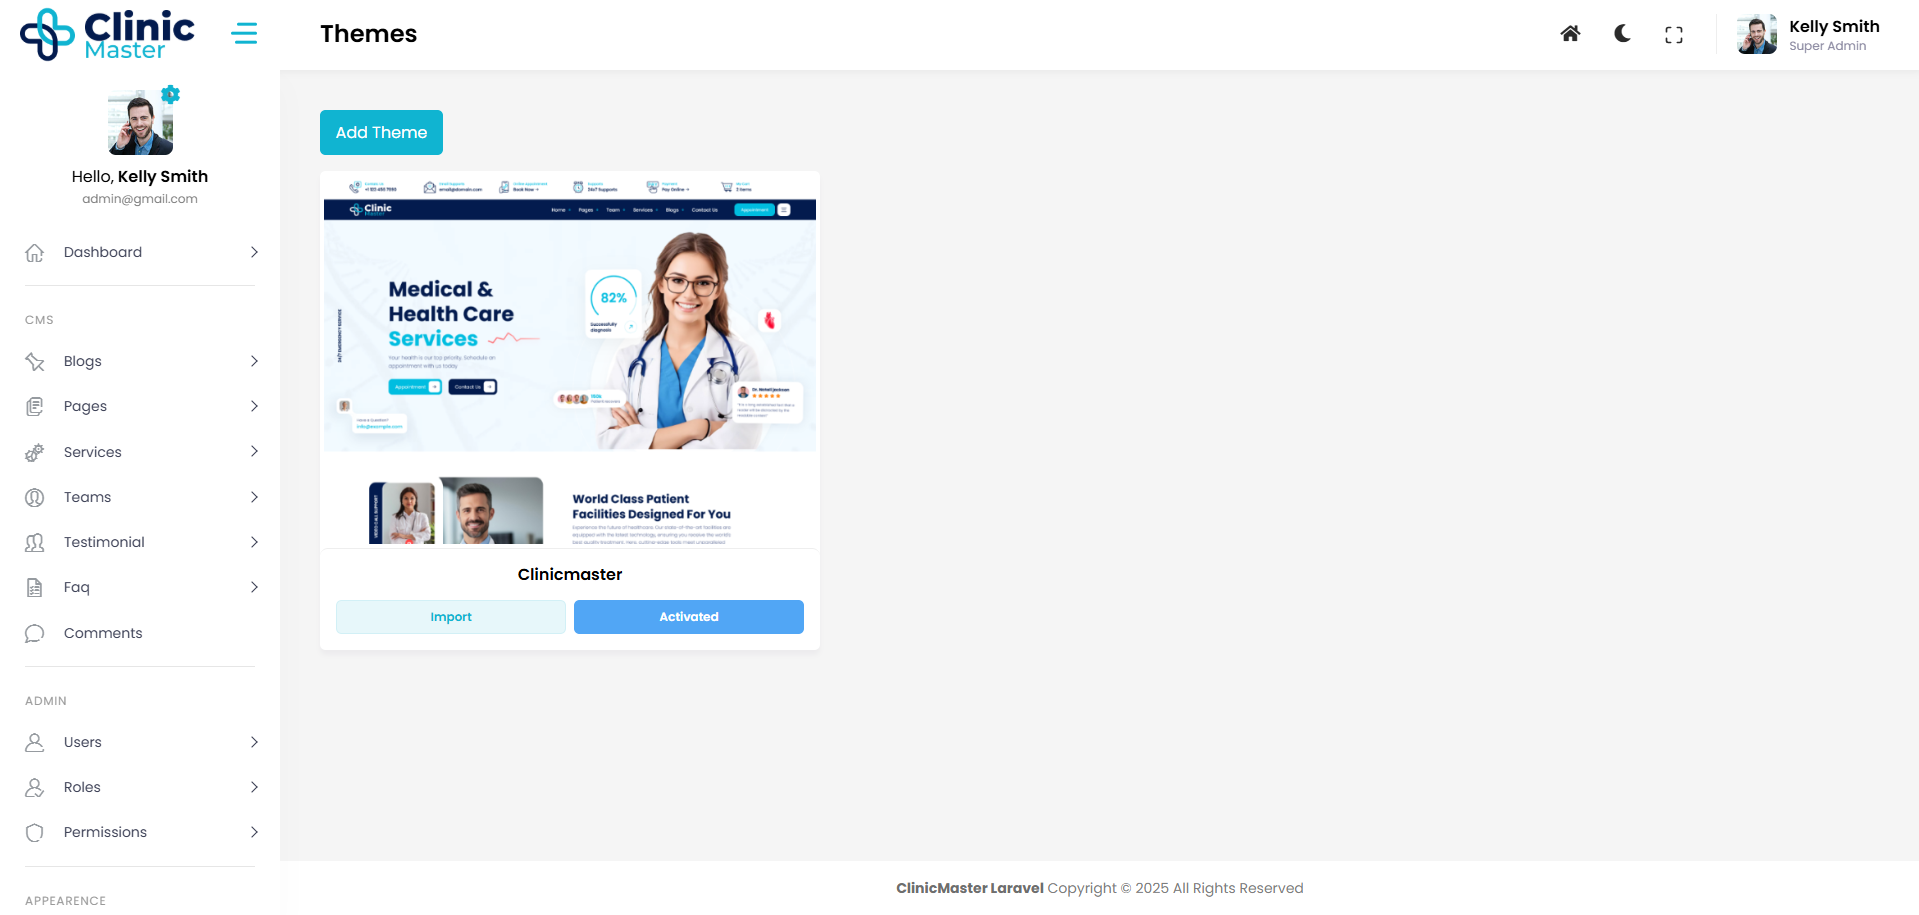
2.- Navigate to the "Themes" Page
- In the W3cms dashboard, look for the "Appearance" menu in the left-hand sidebar.
- Click on "Themes" under the "Appearance" section. This page will show all the themes installed on your site, including the active theme.
3.- Ensure Your Theme is Activated
- Make sure the theme from which you want to import demo content is activated.
- If it’s not activated, click on Activate under the theme thumbnail.
4.- Locate the "Import Demo" Button
- After the theme is activated, you'll see the "Import Demo" button below the theme's image in its box.
5.- Click the "Import Demo" Button
- Click the "Import Demo" button to trigger the import process. After clicking the "Import Demo" button, a popup modal will appear with three radio button options:
- Draft All Existing Content: This will draft your current Content Like posts, pages, comments, Custom Post Types, categories, and tags while importing the demo content. So that nothing will be lost and user can manage the data himself.
- Delete All Existing Data and Set Up New Theme: This will delete your existing data (Like posts, pages, comments, Custom Post Types, categories, and tags) and import the demo content, setting up the theme from scratch.
- Import Data Without Deleting Existing Data: This will import the demo content without deleting or modifying your existing data.
- Choose the option that best suits your needs.
6.- Save Changes and Wait for the Import to Complete
- Once you've selected your preferred demo import option, click the Save Changes button to begin the import process.
- W3cms will now import the demo content based on the option you've chosen. This may take a few minutes, depending on the size of the demo content.
- Once the import is complete, check the Pages, Posts, and Appearance > Widgets sections to see the imported content.
- You can now go to the front-end of your site to preview how it looks and make any further adjustments to match your style.
Credits -
-
Laravel
-
Jquery
-
Bootstrap
-
imagesloaded
-
lightgallery
-
magnific-popup
-
masonry
-
Swiper js
Do You Need Help To Customization
After Purchase A Template...
You Will Start Customizing According Your Requirement
BUT What If You Don't Know
SOLUTION IS HIRE DexignZone
Hire Same Team For Quality Customization
- In Order To Ensure Your Website Is Live, We Will Customize
The Template According To Your Requirements And Upload It to the Server.